
Baby Cardigan Onesie Tutorial

This post may contain affiliate links.
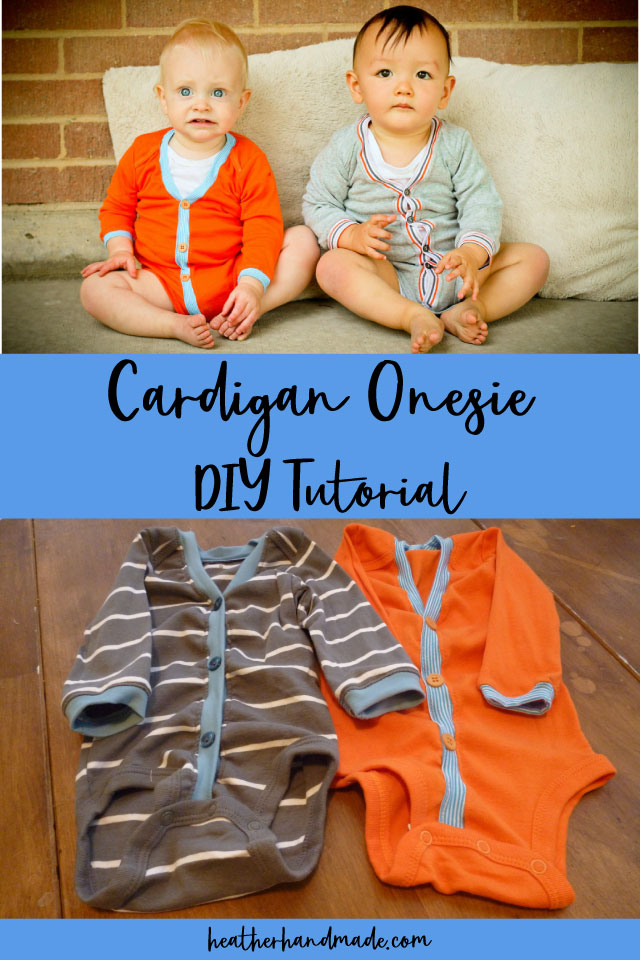
Learn how to make a baby cardigan onesie with a simple DIY tutorial. This baby sewing project is fun and easy to make!
Is your baby ready to be a trendy hipster, geeky nerd, or chic preppy? Choose your baby’s style with the new cardigan onesie style. Just take a long-sleeved onesie make a couple of snips and additions, and it’s a whole new style.

I’ll tell you how to do it in this simple baby cardigan onesie tutorial. I have updated and simplified this tutorial! You can see the new cardigan onesie tutorial or keep reading!
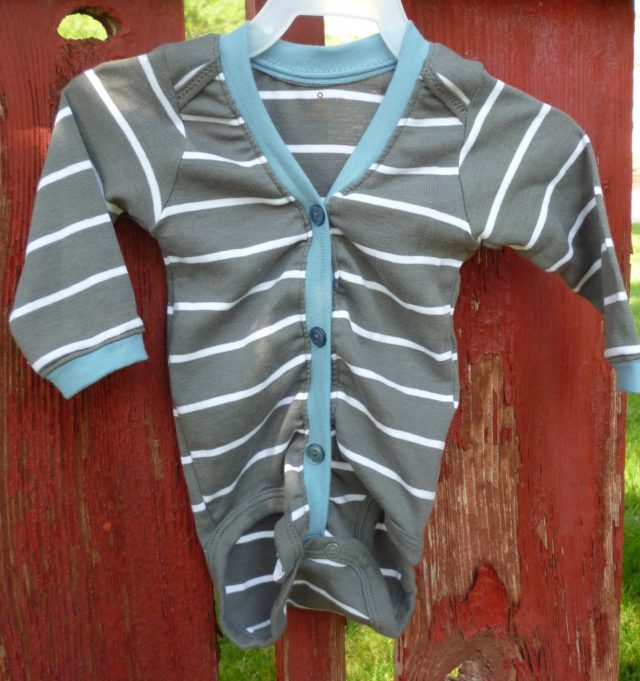
There are lots of fun details about this cardigan even though it’s fairly simple to make. It’s so fun to mix and match the colors and buttons.
I just love baby sewing projects!
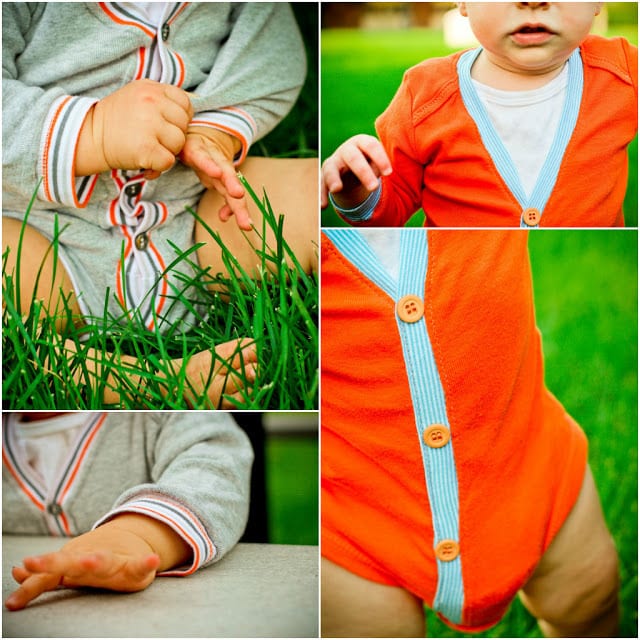
It can be worn with or without pants or a skirt. It would be fun paired with a collared shirt, suspenders, and a bow tie. I would love to see it with a skirt and knee high socks for a little girl!

Update: I’ve had a lot of people have problems with the knit band or ask questions about it. The reason you multiply by .8 is so that the band does not gap or stretch out. When you cut the onesie and then sew a seam, it will stretch.
By using a slightly smaller band, it will counter the stretching out and make it lay nicely. Also, use RIBBING and preferably with spandex to make your life a lot easier.
Baby Cardigan Onesie Tutorial
supplies
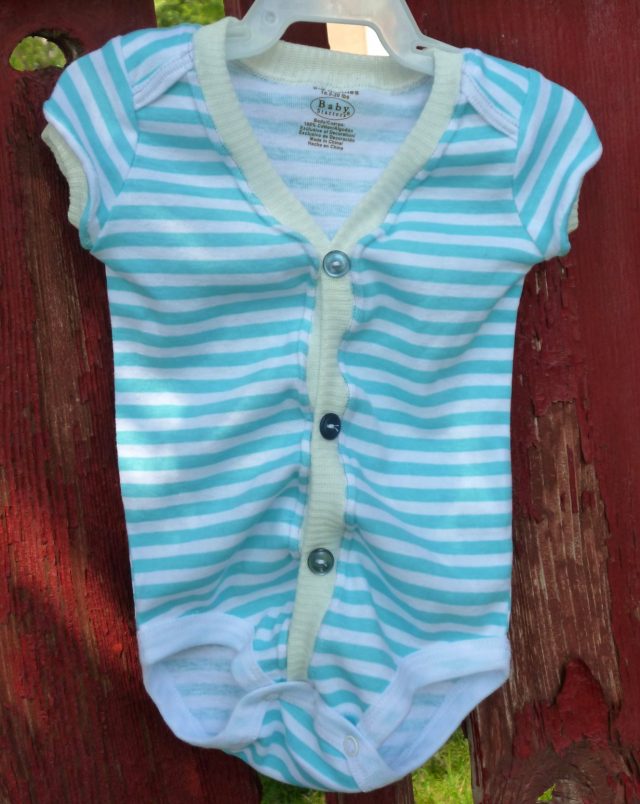
- Long or short sleeved onesie- (I think the short sleeved ones look best on girls.)
- RIBBING (make your life easier by using ribbing with spandex!)
- Buttons or snaps
- Sewing tools and sewing machine
- Find the updated cardigan onesie tutorial here!
- Tips for sewing knit fabric
Instructions
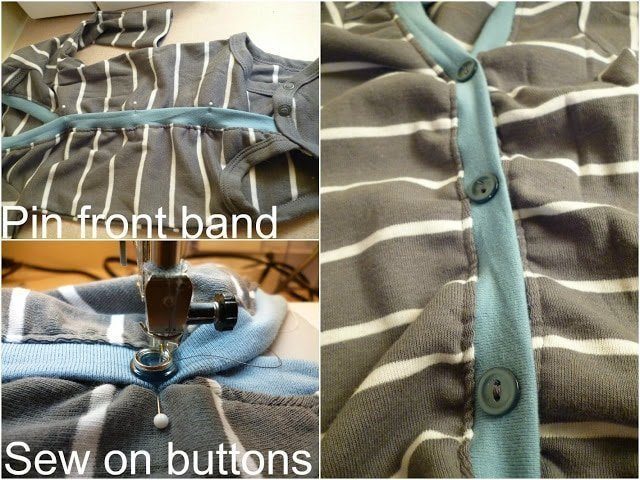
If your onesie has crossover shoulders, find where the crossover lays flat and pin two layers together.
Sew with a straight stitch the two layers together so they don’t come apart.

Measure across the front of the onesie and mark the center all the way down. At the bottom slant to one side between two of the snaps.
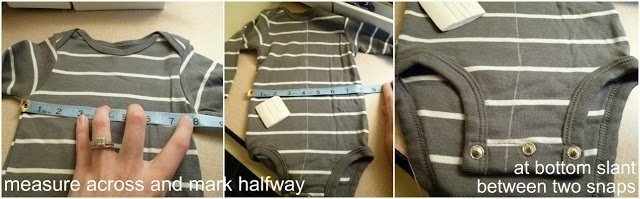
Cut on the line.
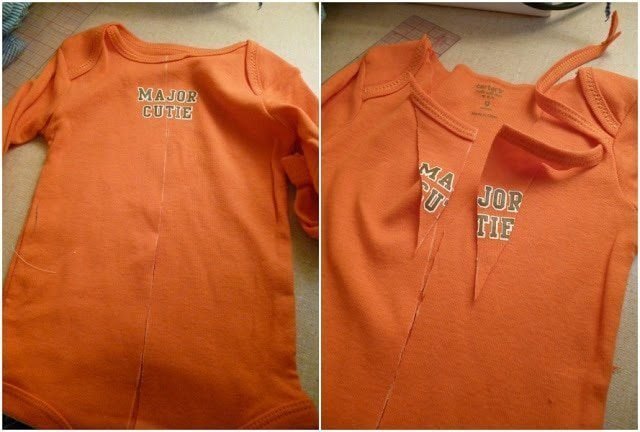
Draw from shoulders to parallel with the armpits.
Cut on lines up around the neckline so that you cut off the neck band.
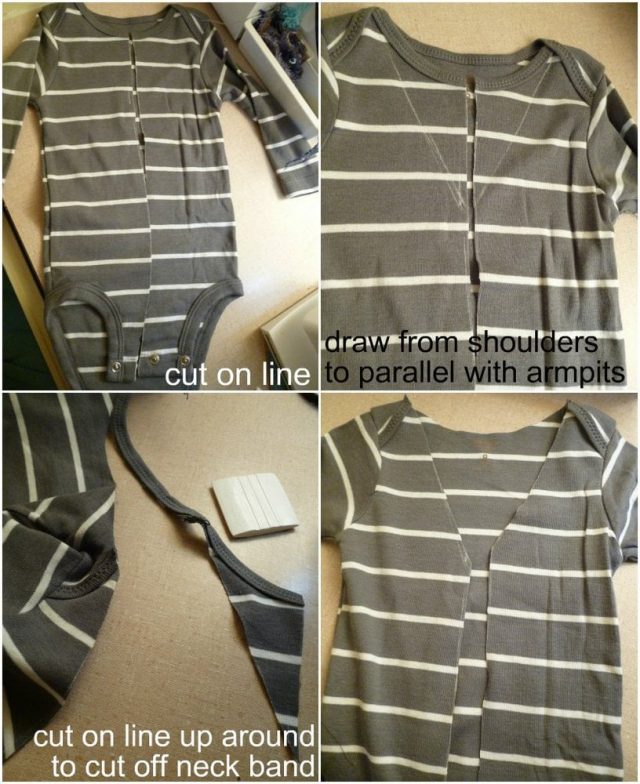
This is perfect if there’s a small picture, phrase, or stain near the neckline that you want to get rid of.
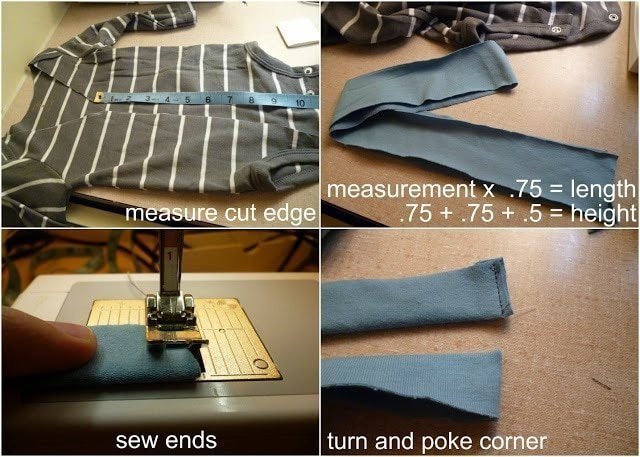
Measure the whole length of the cut edge. Take the measurement and multiply by .8. Add 1/4″ seam allowance.
This is the length of the front band. I wanted my band to be 3/4″ tall, so double that amount and add 1/4″ seam allowance. Make sure the stretch goes with the long sides.
Sew ends at 1/4″.
Turn right side out and poke out corners.
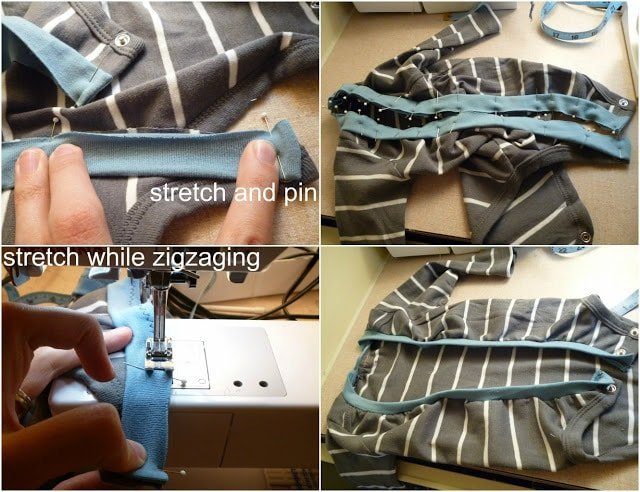
Find the center of the band and then the center of each side, so you divide the band into four sections.
Use the same method to divide the cut edge of the onesie into four sections. Match pins.
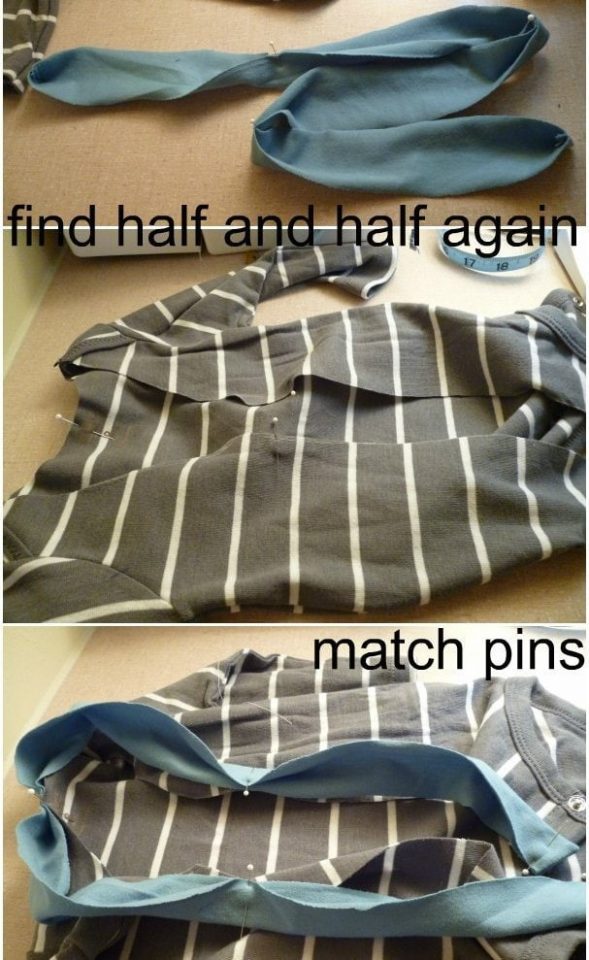
Stretch each section and pin so the excess is distributed evenly.
Stretch while zigzagging at 1/4″.
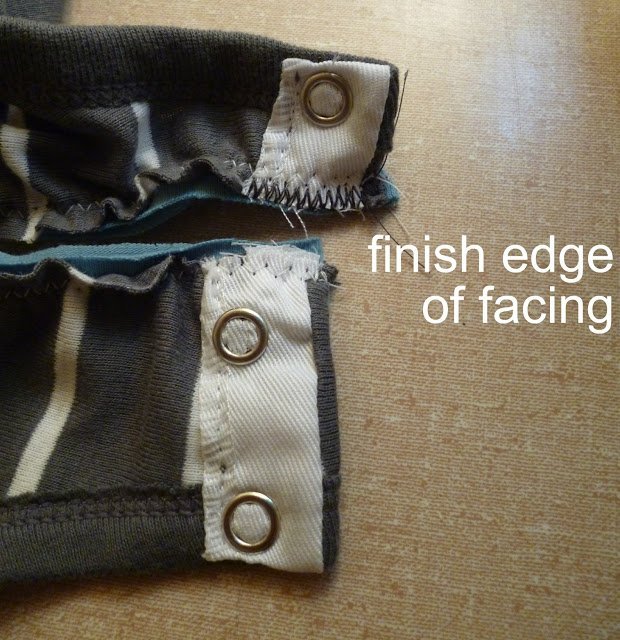
Zigzag the edges of the snap facing to prevent fraying.
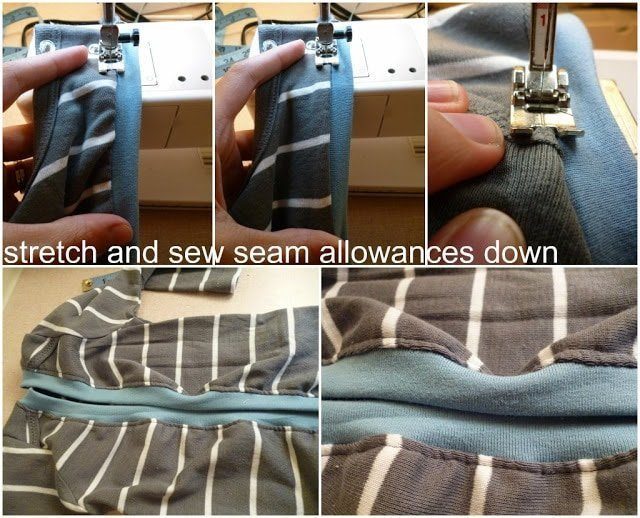
With your machine set on to a straight stitch, stretch and sew the seam allowance towards the onesie. Sew at 1/8″. Careful when going over the shoulders.
Snap the snaps together overlapping the two sides.
Pin the two layers together and sew together.
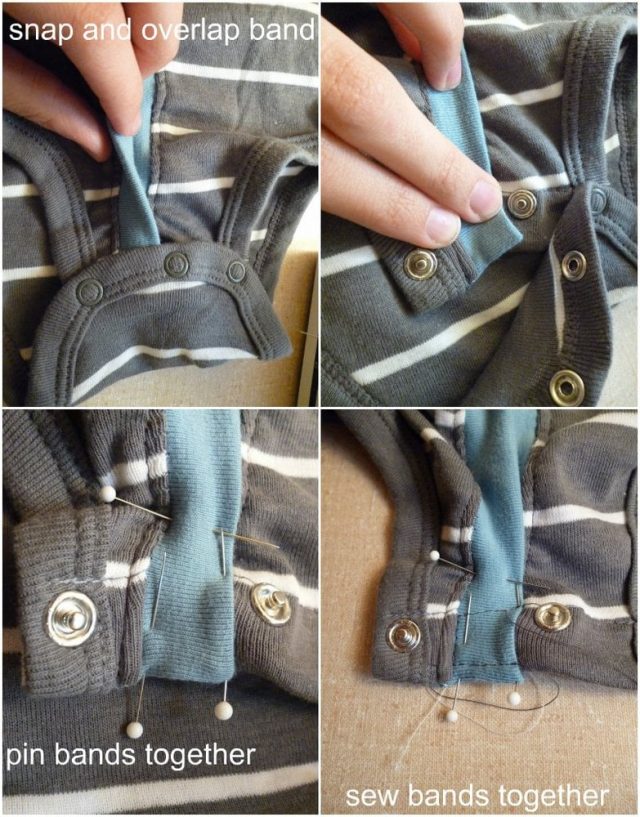
Pin two layers of the front band together at three or four places. Sew buttons on at each pin.
Optional
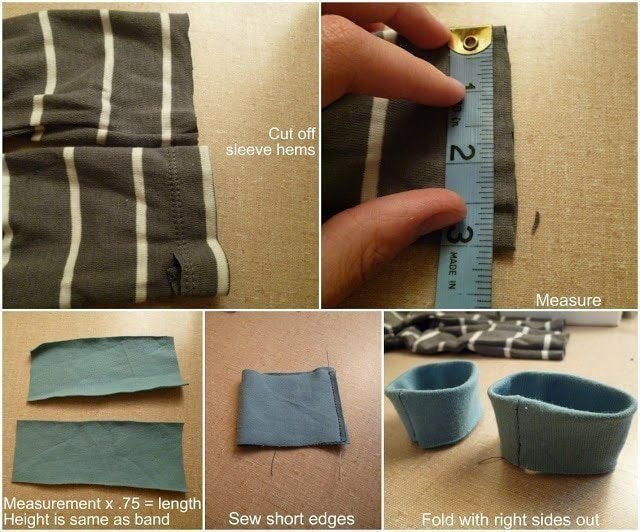
Cut off sleeve hems. Measure length.
Take the measurement and multiply by .8. Add 1/4″ seam allowance. Use the same height as the front band.
Sew short edges to make a tube. Fold in half with right sides out.
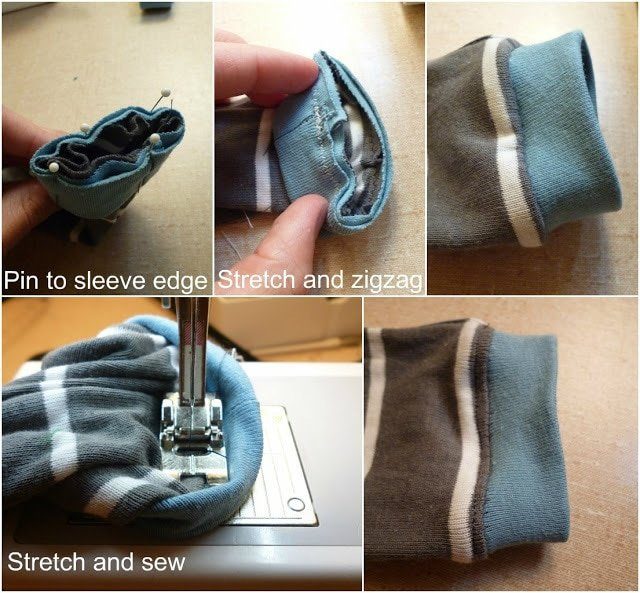
Sew band to each sleeve end at 1/4″ stretching to fit.
With a straight stitch, stretch and sew the seam allowance towards the sleeve at 1/8″.
These baby boys are off to college in their new cardigan onesies.

If you make something using this sewing project, I’d love to see! Please share it on social media with the hashtag #heatherhandmade and tag me!

I believe small sewing moments can create great joy. Find your own “right” way to sew. -Heather
Lol.. I saw this on Pinterest and I was like isn't that so-and-so's baby? Then I saw the background of the photos 🙂 we used to live in the 800 court 🙂
Do you mind my asking where you found the ribbing? I've looked at all the local fabric stores and can't find anything similar.
I know joann's definitely has rib knit. Hancock's doesn't. You'd be able to find rib knit most places online. You could even buy used sweatshirts to use the ribbing from the hem and the sleeves.
I could NOT get the rib knit at Joann's in Nashville TN> I had to go to a speciality store!!
Super cute cardigans! I featured them here:
http://sewprettysewfree.blogspot.com/2013/02/cardigan-onsie-sewing-tutorial.html
I am getting ready to make this for a friend, and I just wanted double check, the buttons are not actually functional correct?
That's right! They aren't needed!
I found that if I multiple the measurement by .80 works better than the .75. Too much puckering when I use good rib knit. I also have a tool that takes off the snap and my husband straightens the prong out so I can reuse it, so I cut it straight down. I didn't like the angle cut especially on the smaller sizes.
I am interested in making these to sell. I don't want to steal your idea or anything so am asking permission. I will be using this tutorial (http://dieselinbloom.blogspot.com/2012_09_01_archive.html) in addition to yours but wanted to check with you as far the the permission to use parts of your tutorial to make my items. I see you have given another etsy store permission to sell also. Thanks so much!
Hello, I just wanted to say I love this idea and tutorial, I hope you don't mind but I posted it on my blog at http://www.doitthriftymom.com with the link to your page. I think moms everywhere need to see this!
I just made this last night. So easy one I figured it out! Thank you for the tutorial, I appreciate it. I'd post a photo if I could.
Email it to me, and I'll post it on the facebook page and feature you!
Heather,
LOVE this tutorial!! Just made my first one last night and your tutorial was great! Question though, I had a really hard time with the border and getting my knit to stretch enough (it worked, was just SUPER difficult to stretch and feed and sew straight), so I'm wondering what would happen if I didn't multiply by .75? THANKS!!
Yay! I'm so glad you made one! I've had a lot of people asking about the knit and having problems with it. The reason that the band is smaller than the body piece is because if it's the same length, the seam will stretch out the area and the band will gap. All knit cardigans do this even though you can't see it.
It will be a lot easier to use ribbing because it stretches well without shrinking. Or multiply by .85 instead.
I hope that helps!
Oh my word this is adorable!
So cute! And excellent tutorial!
This is so adorable!!! Thank you for sharing this tutorial can't wait to make one!
Thank you so much for this tutorial! I used it to make a few for some friends having baby boys in the next few months. http://amyagimudie.wordpress.com/2012/10/25/cute-gift-for-a-baby-boy/
Hey Heather, I'm about to try to make one this weekend! I have a question, and it may seem stupid, but still. Where did you get the knit fabric for cuffs and border? Joanns? I've never bought knit fabric before. Thanks!
Go to http://www.Haddonco.com to purchase one!! More colors and patterns are added daily. Thanks Heather!!
can't wait to get started….my daughter in law sent this post to me two times so I think I'm getting the hint!!!!!!
Your tutorial is SO clear! Thank you! I can't wait to try these as gifts.
Love this Heather! You are so creative and talented!
How cute is this!!! LOVE LOVE LOVE.
Did you multiple by the .75 for the orange and gray cardigans too? They don't look gathered like the gray striped one but it could be because the boys are wearing them. Love the tutorial and can't wait to make some for my little guy. Thanks so much!
I did multiply by .75 for the orange and gray cardigans you just can't see it while the boys are wearing it because the fabric gets stretched out.