
Baby Cardigan Onesie Tutorial

This post may contain affiliate links.
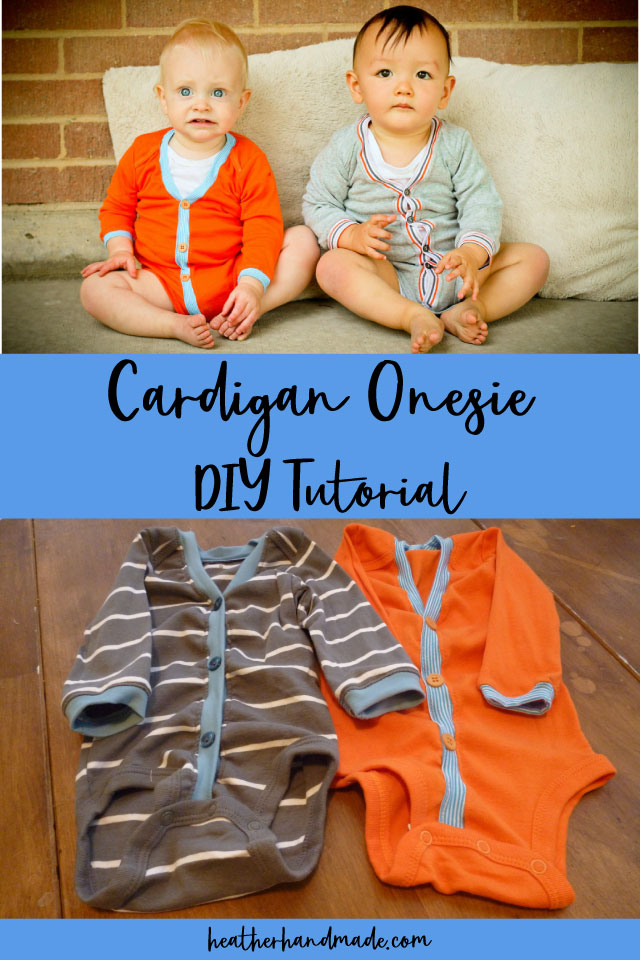
Learn how to make a baby cardigan onesie with a simple DIY tutorial. This baby sewing project is fun and easy to make!
Is your baby ready to be a trendy hipster, geeky nerd, or chic preppy? Choose your baby’s style with the new cardigan onesie style. Just take a long-sleeved onesie make a couple of snips and additions, and it’s a whole new style.

I’ll tell you how to do it in this simple baby cardigan onesie tutorial. I have updated and simplified this tutorial! You can see the new cardigan onesie tutorial or keep reading!
There are lots of fun details about this cardigan even though it’s fairly simple to make. It’s so fun to mix and match the colors and buttons.
I just love baby sewing projects!
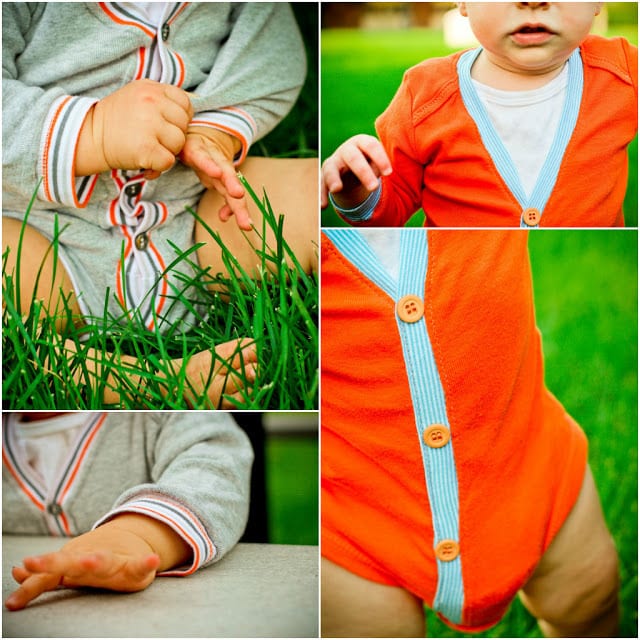
It can be worn with or without pants or a skirt. It would be fun paired with a collared shirt, suspenders, and a bow tie. I would love to see it with a skirt and knee high socks for a little girl!
Update: I’ve had a lot of people have problems with the knit band or ask questions about it. The reason you multiply by .8 is so that the band does not gap or stretch out. When you cut the onesie and then sew a seam, it will stretch.
By using a slightly smaller band, it will counter the stretching out and make it lay nicely. Also, use RIBBING and preferably with spandex to make your life a lot easier.
Baby Cardigan Onesie Tutorial
supplies
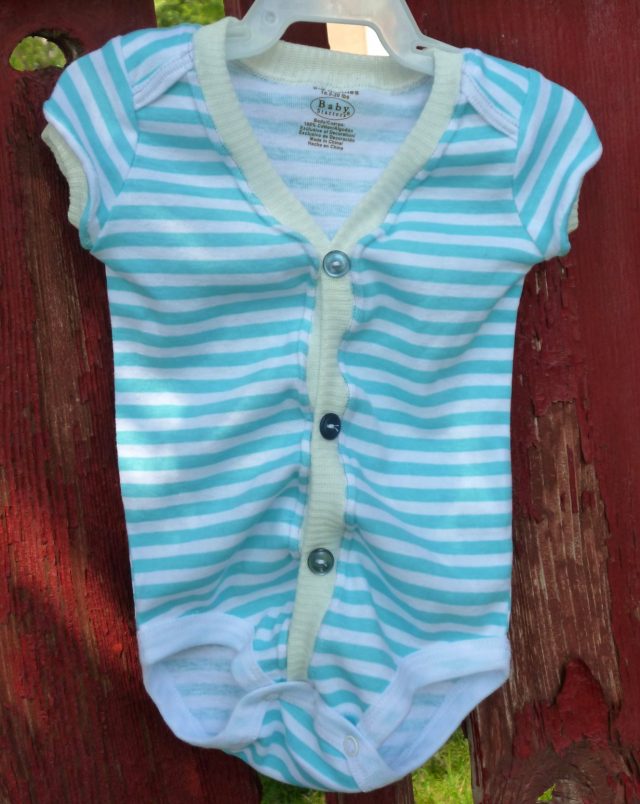
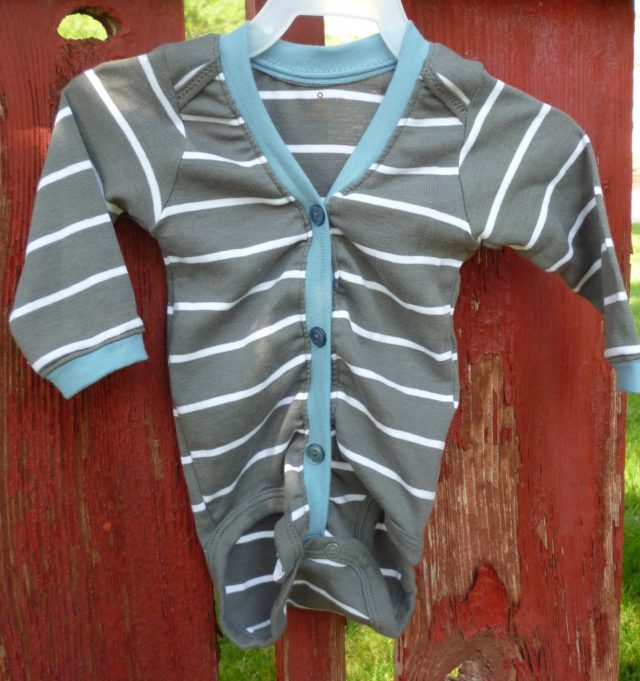
- Long or short sleeved onesie- (I think the short sleeved ones look best on girls.)
- RIBBING (make your life easier by using ribbing with spandex!)
- Buttons or snaps
- Sewing tools and sewing machine
- Find the updated cardigan onesie tutorial here!
- Tips for sewing knit fabric
Instructions
If your onesie has crossover shoulders, find where the crossover lays flat and pin two layers together.
Sew with a straight stitch the two layers together so they don’t come apart.

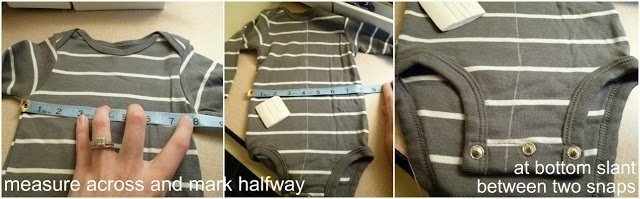
Measure across the front of the onesie and mark the center all the way down. At the bottom slant to one side between two of the snaps.
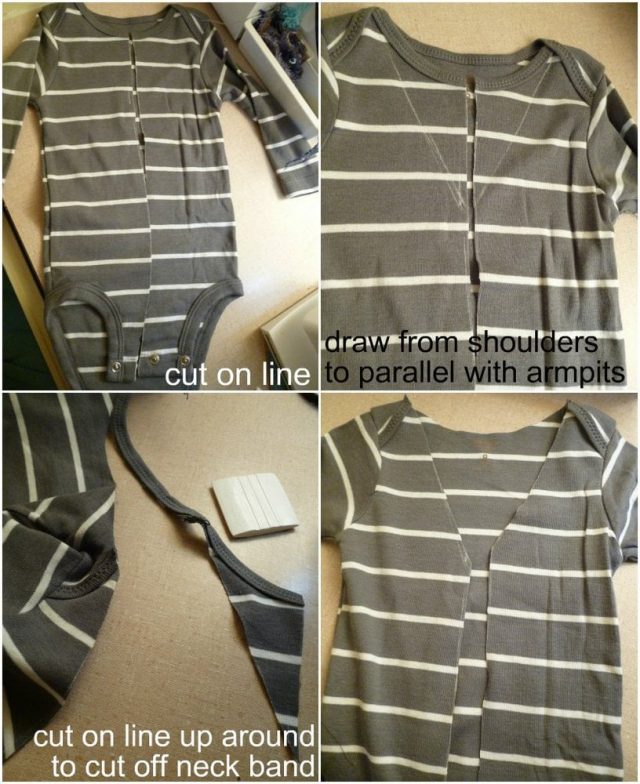
Cut on the line.
Draw from shoulders to parallel with the armpits.
Cut on lines up around the neckline so that you cut off the neck band.
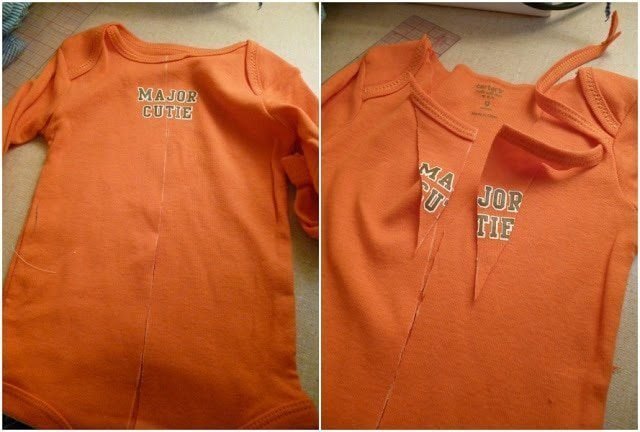
This is perfect if there’s a small picture, phrase, or stain near the neckline that you want to get rid of.
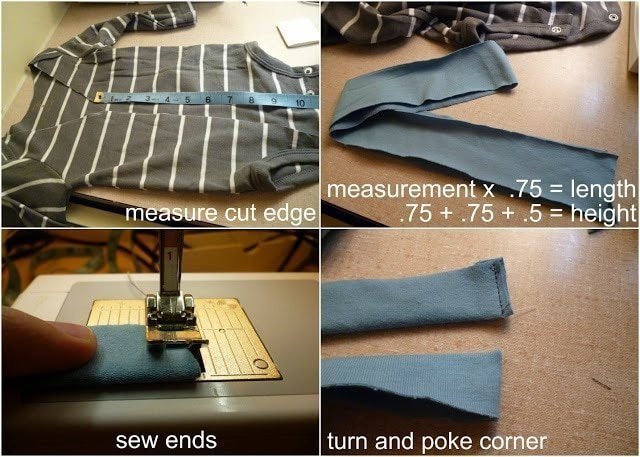
Measure the whole length of the cut edge. Take the measurement and multiply by .8. Add 1/4″ seam allowance.
This is the length of the front band. I wanted my band to be 3/4″ tall, so double that amount and add 1/4″ seam allowance. Make sure the stretch goes with the long sides.
Sew ends at 1/4″.
Turn right side out and poke out corners.
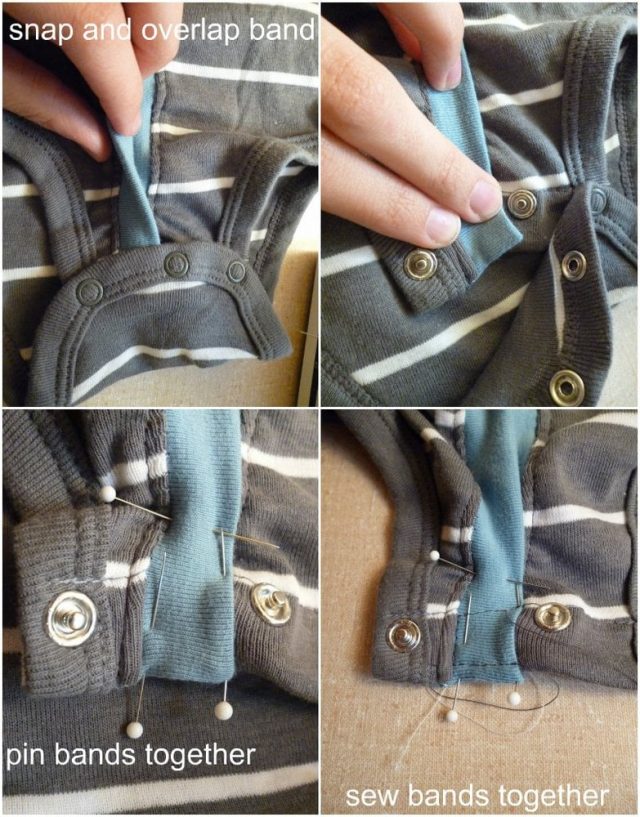
Find the center of the band and then the center of each side, so you divide the band into four sections.
Use the same method to divide the cut edge of the onesie into four sections. Match pins.
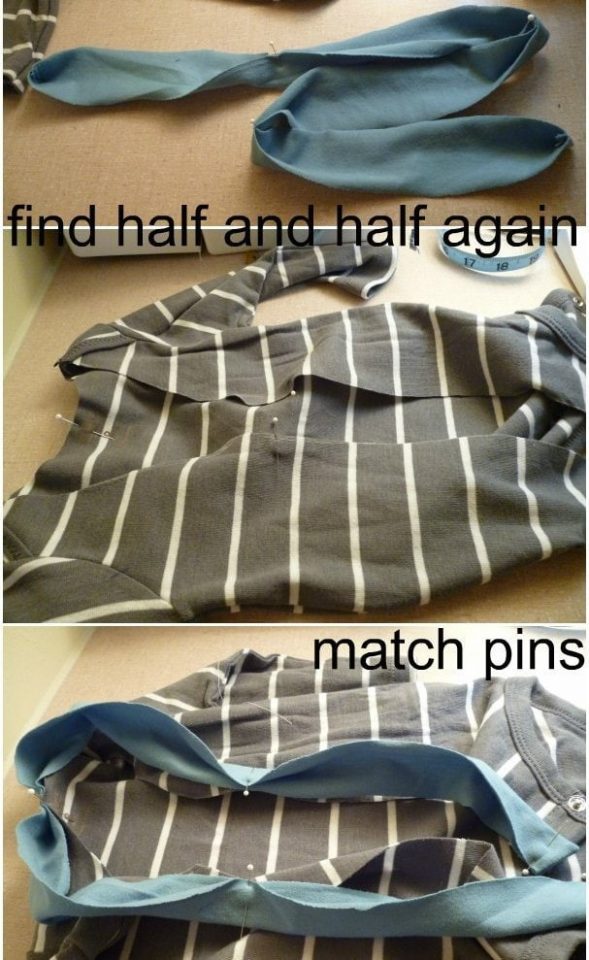
Stretch each section and pin so the excess is distributed evenly.
Stretch while zigzagging at 1/4″.
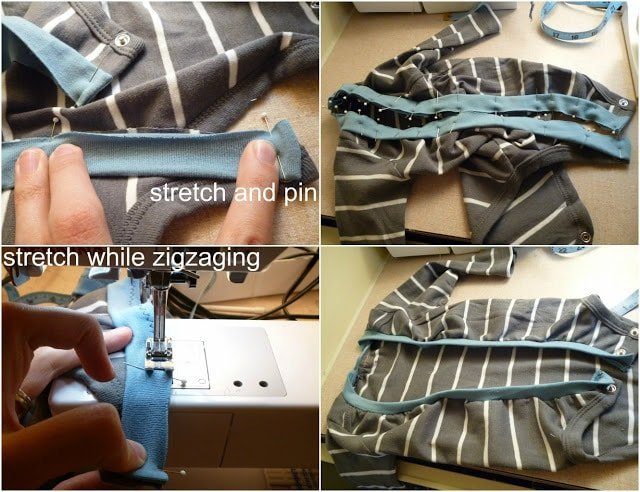
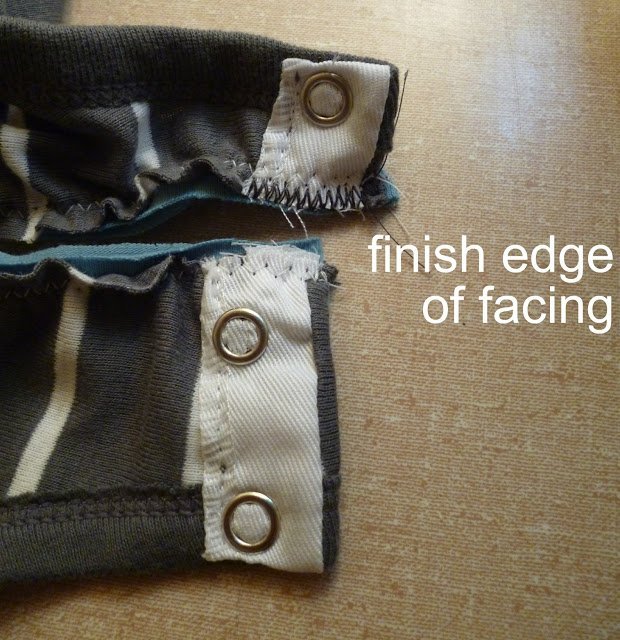
Zigzag the edges of the snap facing to prevent fraying.
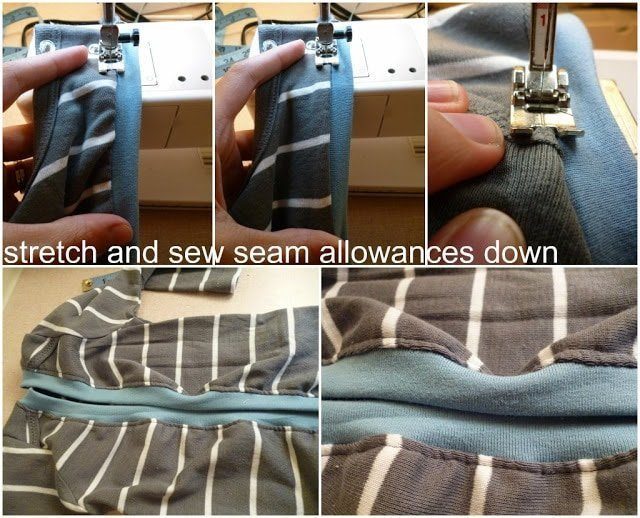
With your machine set on to a straight stitch, stretch and sew the seam allowance towards the onesie. Sew at 1/8″. Careful when going over the shoulders.
Snap the snaps together overlapping the two sides.
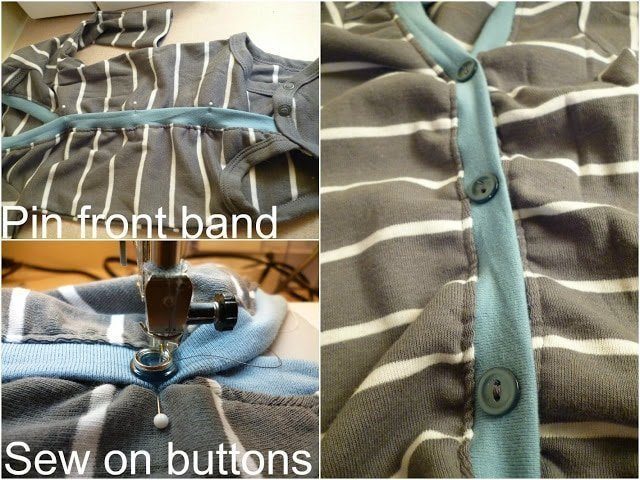
Pin the two layers together and sew together.
Pin two layers of the front band together at three or four places. Sew buttons on at each pin.
Optional
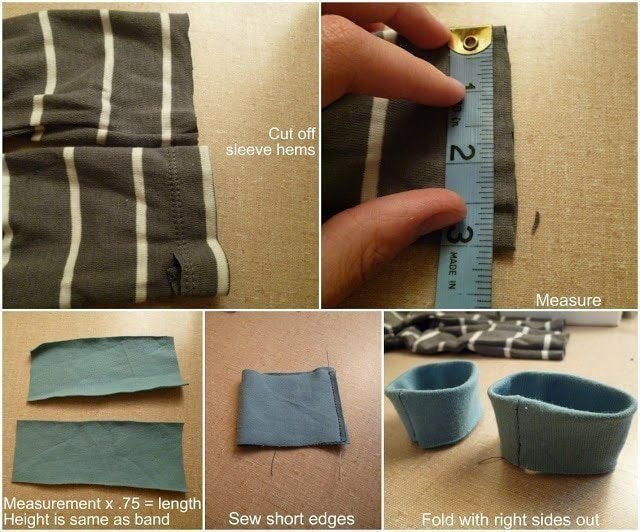
Cut off sleeve hems. Measure length.
Take the measurement and multiply by .8. Add 1/4″ seam allowance. Use the same height as the front band.
Sew short edges to make a tube. Fold in half with right sides out.
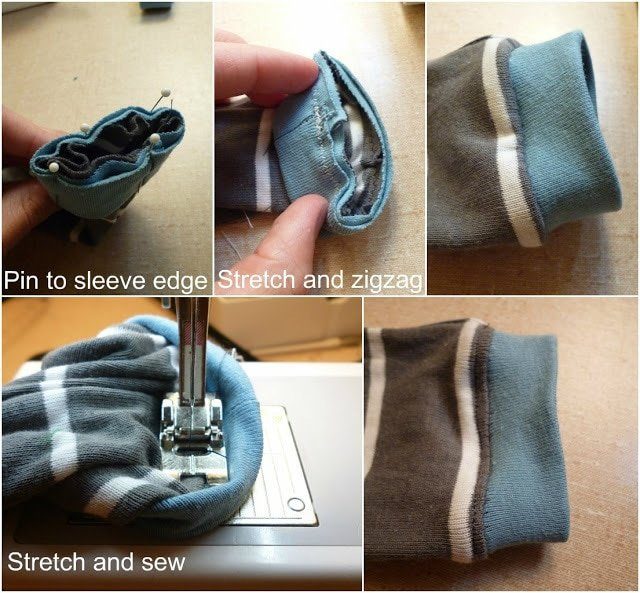
Sew band to each sleeve end at 1/4″ stretching to fit.
With a straight stitch, stretch and sew the seam allowance towards the sleeve at 1/8″.
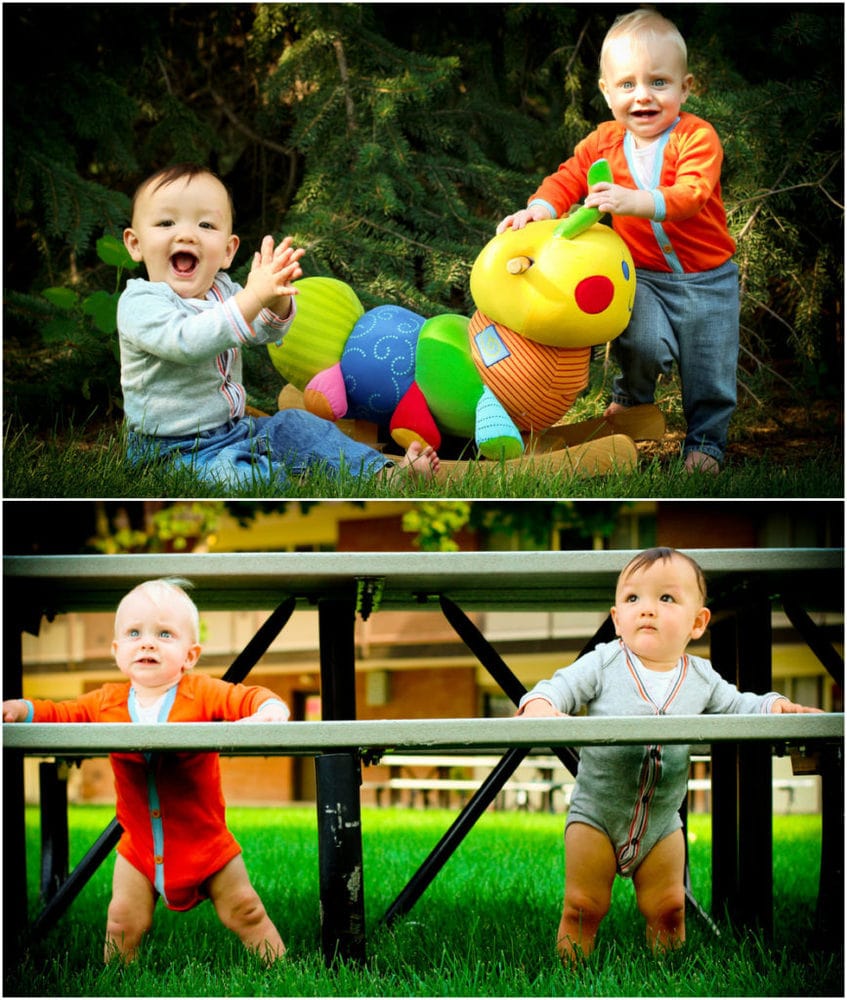
These baby boys are off to college in their new cardigan onesies.

If you make something using this sewing project, I’d love to see! Please share it on social media with the hashtag #heatherhandmade and tag me!

I believe small sewing moments can create great joy. Find your own “right” way to sew. -Heather
Heather, will you let me know if you would be willing to sell one? [email protected]
http://www.etsy.com/listing/109892846/baby-cardigan-onesie-preppy-baby-boy
Any ladies selling in etsy. Or selling period . I have to havesome from my lil guy!!
Not that I know of. I own the creative rights and haven't had anyone ask. I'm also currently not making and selling any.
I don't sew, but would love to buy some!
http://www.etsy.com/listing/109892846/baby-cardigan-onesie-preppy-baby-boy
Where did you get the caterpillar rocking horse?
I got it at a yard sale in my apartment complex.
Adorable!!!!!
You are a GENIUS!!! I love this and will be trying this for the grandkids!
You are a GENIUS!!! I love this and will be trying this for the grandkids!
This is soooo adorable! What a fantastic idea. Love!
Babys look so cute!!!! Thanks for the tutorial!
LOVE this! My little man definitely needs one of his own.
In that last picture he looks like Calvin from Calvin and Hobbes.
oh my goodness! super cute idea. I hate sweatshirts for little boys because they ride up, but this would totally stay in place.
amazing!! I love it!
This is so cute Heather! I might try it for James 🙂
This is awesome. I love it. Your creativity never ends.
super cute! how long did this take you?
I've made three so far, and get faster each time, but they probably take an hour or less. It's hard to say because I take so many breaks!
What a great idea! And a great way to continue to use the cute onesie even after they get stained. Thank you, you are amazing!
HOW CUTE!!! Definitely pinning this.
that is so cute! What a genius idea!
Super duper cute! I'm very impressed Heather! If you keep up all these tutorials I might be inspired to invest in a sewing machine! Way to go!!!
OH. MY. GOODNESS HEATHER!! !I AM DYING!! This is simply FABULOUS!!! Love it so much!!! Pin pin pin pin pin pin pin