
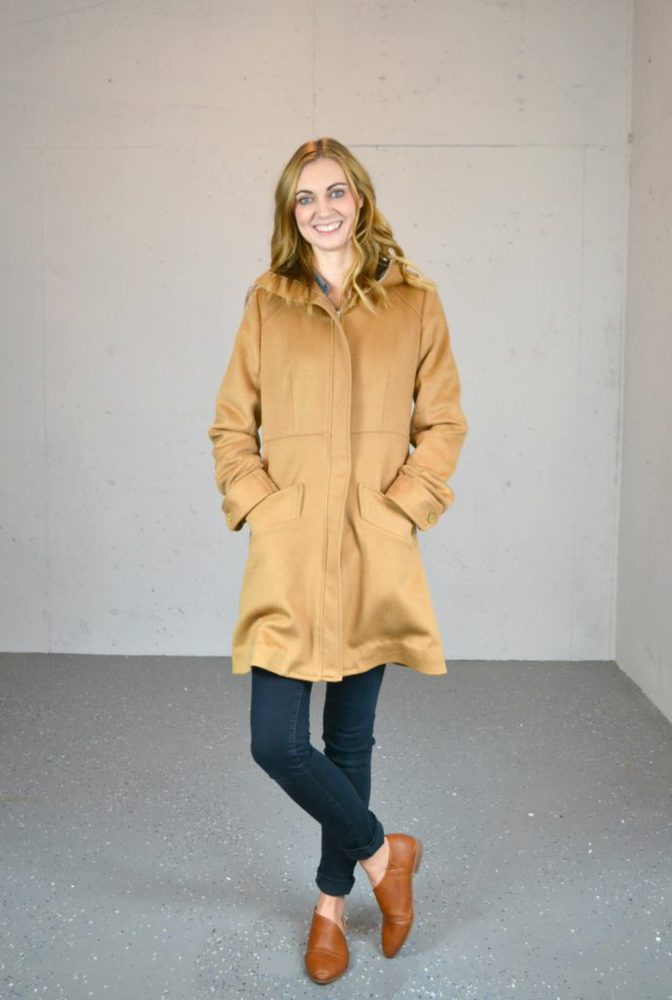
Refashioned Coat with the Pepernoot Coat Pattern

This post may contain affiliate links.
I am so proud of this refashioned coat. It’s the first coat I’ve made in years, and it’s really special because of where I got the fabric. My grandmother recently went to a care center and doesn’t need a wool coat anymore.
She gave it to me to see if I could do something with it. The hems and edges were pretty worn out and the lining was falling apart, but the main parts of the original coat were in really good condition. I knew I would be able to use it well.
I love being able to reuse something with history and stories, and I love keeping it from being thrown away. It it would’ve gone to a thrift store it probably would’ve been throw away because the edges and lining were so worn out. But now I get to wear a coat and feel wrapped in the love and life of my grandmother. I love this refashioned coat!
I’ve also refashioned a Hudson Bay coat and pulled a list of stunning coat refashions!
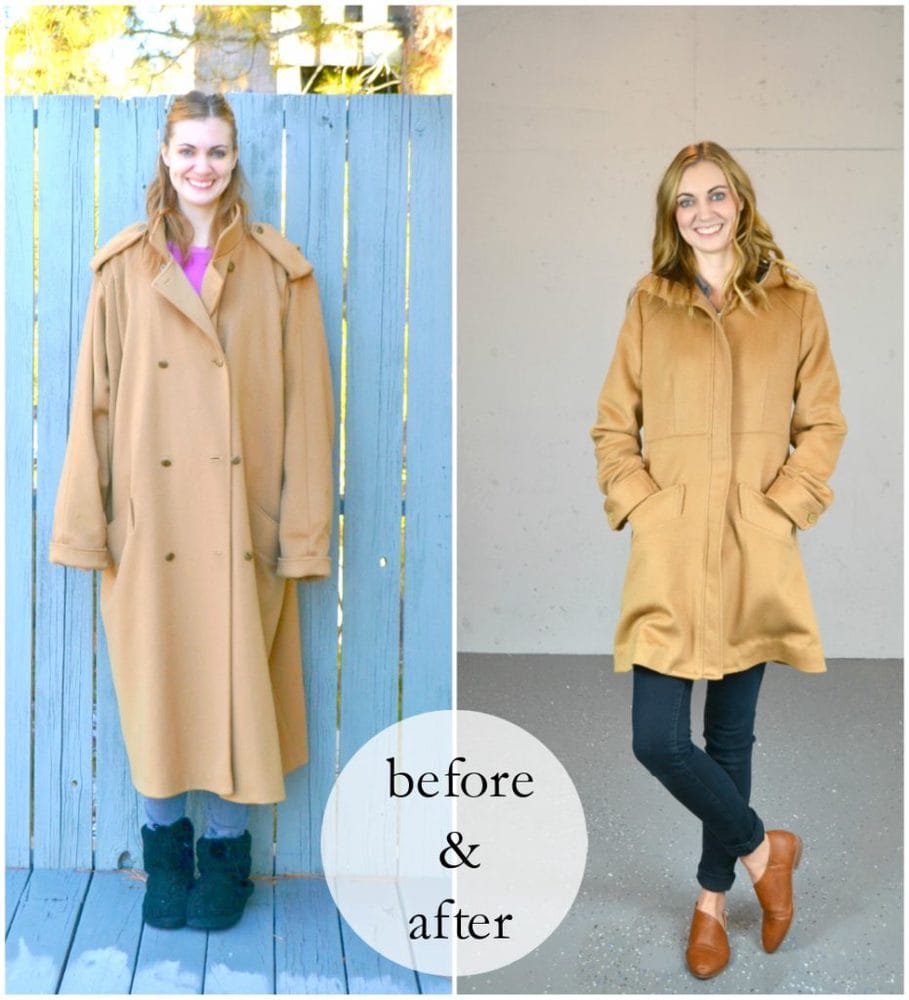
Before
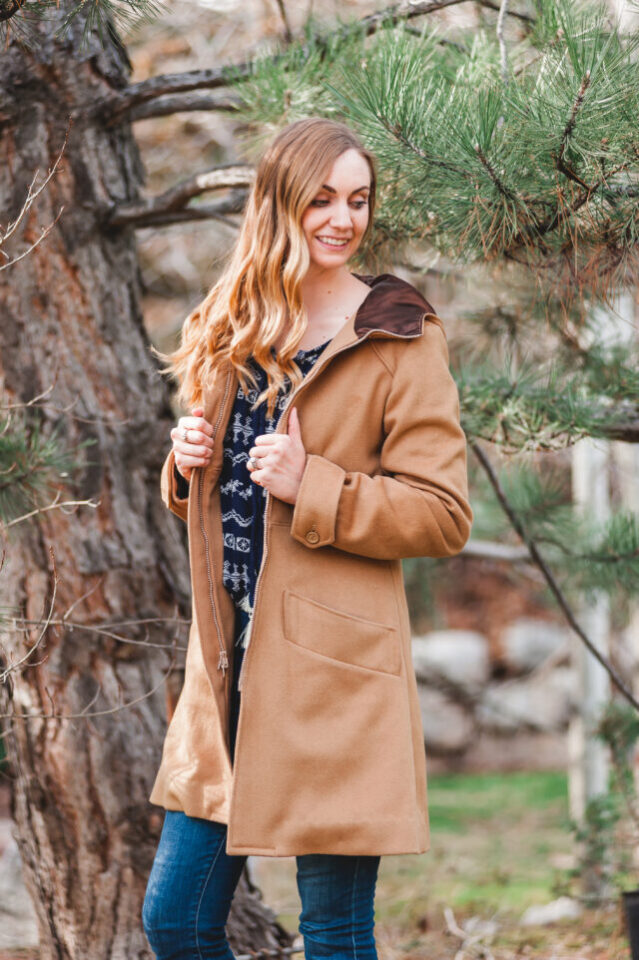
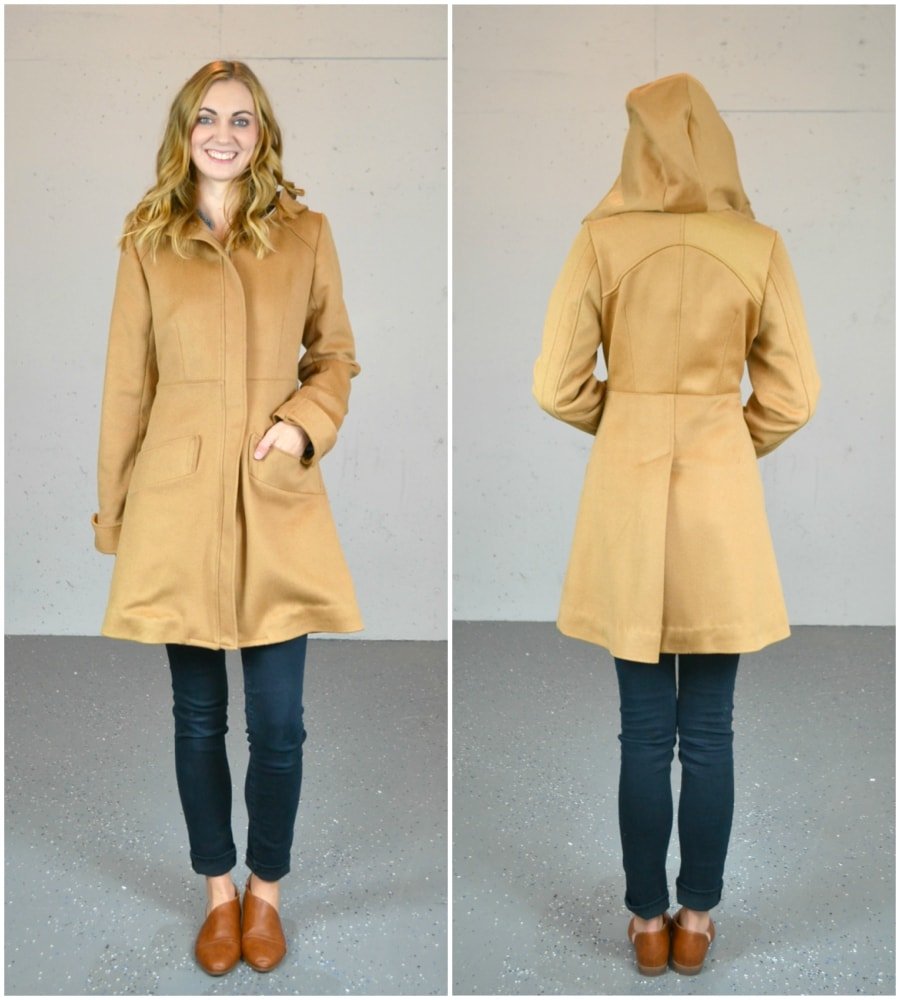
The original coat was a mid-calf length peacoat with dolman sleeves and shoulder pleats meaning that it had lots of extra fabric. It was a wool with a good weight and thickness. I would categorize it as a heavy weight fabric.
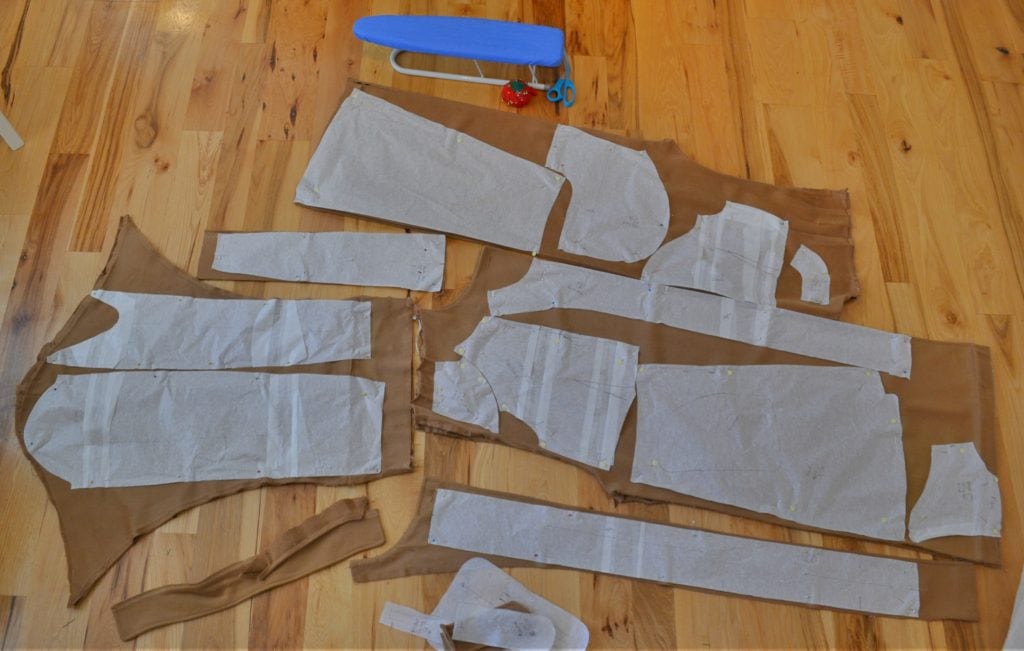
The first thing I did was removed the lining from the inside. It was so old and weak that it literally just ripped right out. (I wouldn’t be surprised if it was acetate: the one-wear wonder.) I didn’t even need to use a seam ripper to open the seams.
Then I unpicked almost every seam to separate the pieces of fabric and ironed the seams and hems flat. I decided to use a sewing pattern to be able to get the perfect fit. It was pretty tricky to fit all the pieces in but with some careful maneuvering I was able to make it work.
I tried to avoid the worn out areas or put them in the new seam allowance the best I could. The only places that show the original wear are the pockets and a little spot on the hood. Everywhere else looks brand new!
The Sewing Pattern
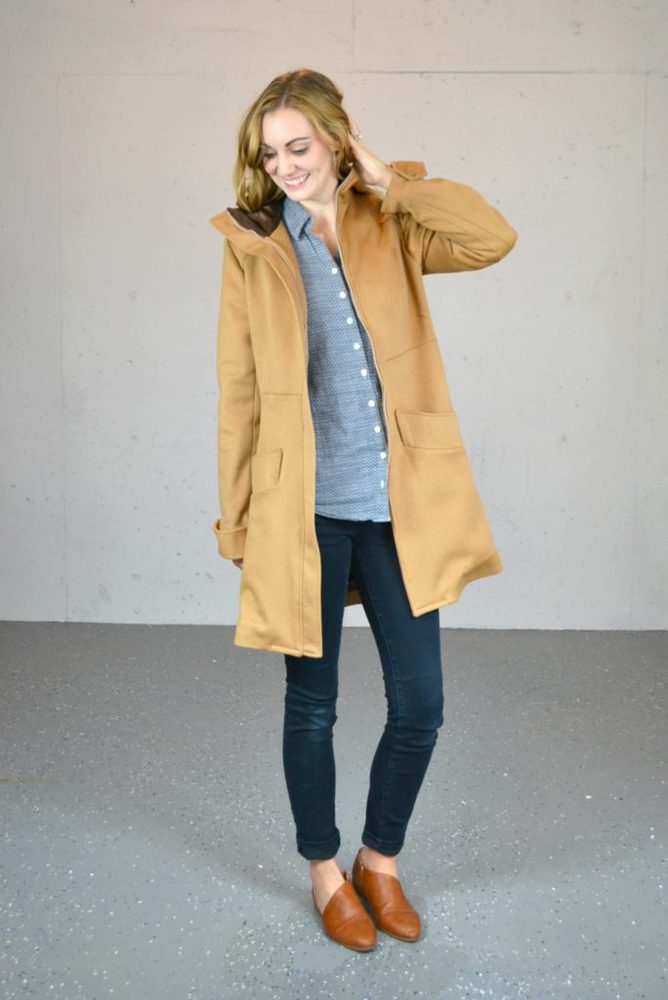
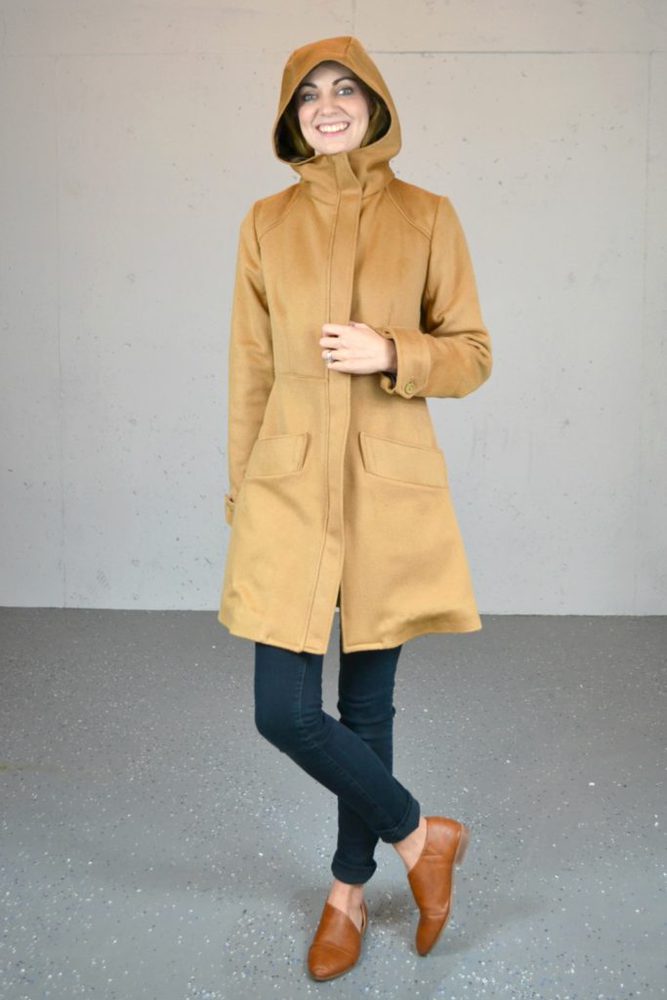
I used the Pepernoot Coat sewing pattern that I had in my stash. I got the paper pattern version at a sewing meetup last Spring. I love the feminine classic details and that it was a zipper and not buttons. Learn how to fix a zipper if the pull came off.
I loved that it had pockets and a hood which are essential in my coats. There were tons of pieces, but I loved that there were separate lining pieces for the whole coat. The pattern is drafted really well, and the instructions were stellar.
I’ve made coats before, but I was really pleased with the pattern pieces, the instructions, the nice finishings, and how well the refashioned coat turned out.
Pattern Alterations
I decided not to do a muslin this time. I traced the size that fit my measurements and held it up to the Kelly Anorak that I made last Spring to figure out length. I found that I needed length just above the waist and through the shoulders and sleeves.
You can see below that the coats armscye comes fairly low, but I really wanted the space to wear layers underneath for warmth. Even with the armscye being lower I still have great arm mobility. I ended up adding two inches total length above the waist.
I could have added a little more, but it fits really well for no muslin. I also did a 3/8″ broad back adjustment. I don’t know if I really needed it, but I hate jackets being tight across my upper back. I think that helps with arm mobility too.
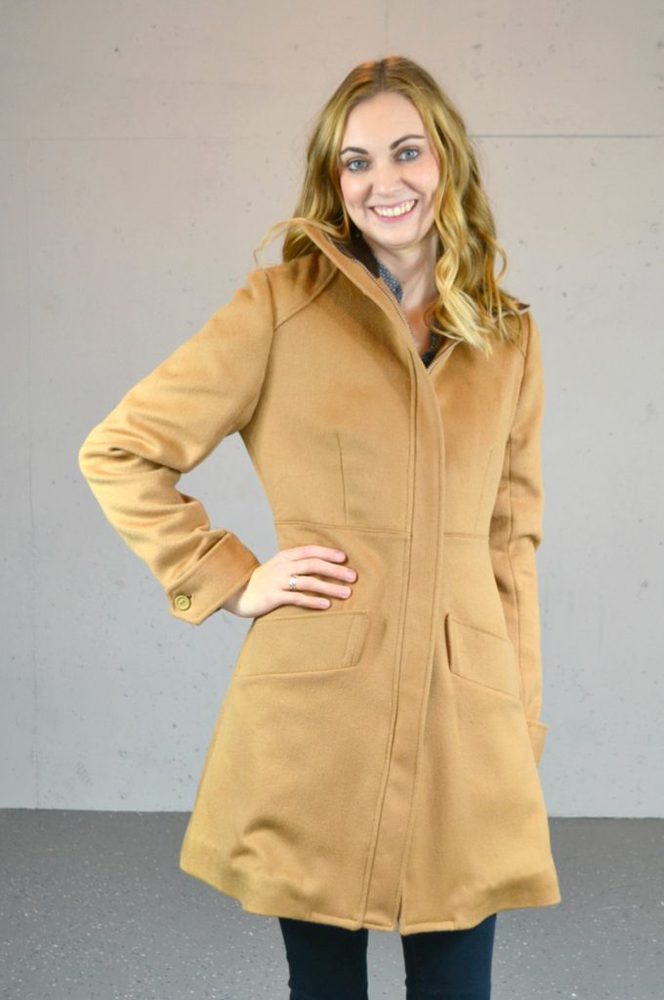
I was surprised at how high the front neckline of the hood comes up. It’s actually a little too tall, and I probably won’t ever zip it up that high.
It partly could be that it’s extra stiff because I did interfacing on both sides of the zipper cover band instead of just one. I guess I would use it if I were really cold; it definitely would keep my neck warm and cozy.
Keeping the Details
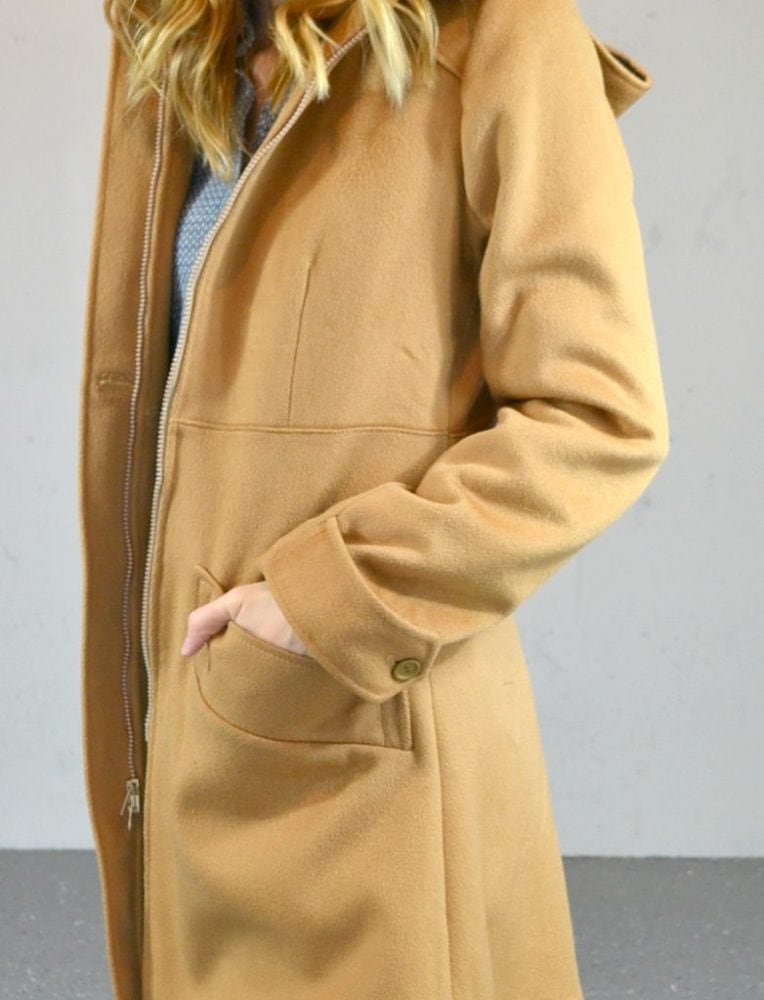
My favorite part is the details I was able to keep from the original coat. I kept the pockets and added new pocket lining, and then added extra stability anchoring stitches to the angled part. I also took the shoulder tabs off and added them to the sleeves.
I reused the camel colored buttons that were inside instead of reusing the original gold buttons. I also kept the back pleat on the skirt of the refashioned coat which is just so cute. That back pleat is just the perfect detail, and it makes it even that much more feminine.
Unfortunately, the facings and front band had to be cut from fabric that had buttonholes. There was no other fabric to use. So I carefully unpicked the buttonhole stitching and did some mending before sewing it up.
You can’t see the mending anywhere except when you look inside the coat. It’s a good reminder of where the coat came from and what it means to me. In the photo below you can see two areas of mending right at my waist on the inside.
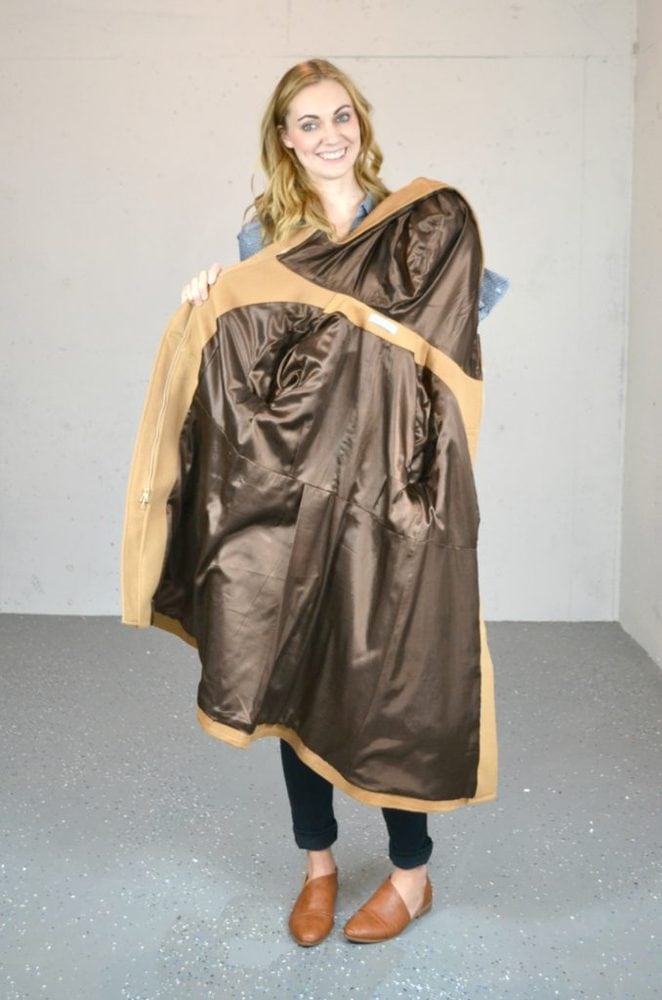
Lining and Interfacing
I lined the whole coat with brown satin backed flannel. I wanted something warmer than regular slippery fabric and had heard about satin backed flannel. I would say it’s more of a satin backed broadcloth, but it’s still a warmer option than anything else.
I love that it gives my coat extra warmth while still being smooth and slippery inside. It was really easy to work with, and I’ll choose it again as coat lining again in the future. I went with brown because I knew I would appreciate a lining that would blend in with the wool.
I love bright, happy linings, but I feel like the sophisticated look of this refashioned coat need a simple lining.
I was able to save the interfacing from the original coat for the front facings. Then I added iron-on interfacing to the back facing, front band, and underneath the zipper. I also added 7/8″ heatnbond hem tape* to the skirt hem and sleeve hems to get as crisp a hem as possible on thick, coat weight fabric.
I’m really happy with how the coat turned out. It was a lot of work like every coat is a lot of work, but it was worth it to save the fabric from the coat. It’s so special to be able to wear a refashioned coat that my grandmother wore and save all the good parts.
I finished it recently and haven’t been able to show her yet. I can wait to show her that I saved it and that I’ll wear it for a long time to come! Refashioning is sometimes more work than other sewing projects, but it’s definitely worth it.

I believe small sewing moments can create great joy. Find your own “right” way to sew. -Heather
You are so resourceful; and I love that you repurposed something from your grandmother!!
Question for you…just bought a men’s wool coat at a thrift store. It fits me wonderfully but it’s obvious I am wearing a men’s coat because of the buttons on the opposite side. Any suggestion on how I can fix this??
I’m not sure if this will work, but what if you zigzag the buttonholes closed and sew the buttons over the closed buttonholes to cover them. Then sew new buttonholes on the other side. Does that make sense?
your grandma would be so proud of your accomplishment!! Did you model it for her?
I did! She loved it!
Thank you so much for this post! I’ve been looking for examples all over the internet of refashioned wool coats from older, larger, coats.
PS, could you tell us what type of shoes you are wearing here? They are amazing!
Thank you so much! Here are the shoes: https://amzn.to/2U1l1z6*
[…] dart and 1 below the elbow dart. I decided not to add length to the body because I already have a long coat and wanted a different look. I also liked the shorter look of the inspiration coat. I’m […]