
How to Install Snaps on Baby Clothes

This post may contain affiliate links.
Learn how to install snaps on baby clothes for easy baby sewing projects. These are the best snaps for baby clothes, and the pliers making installing easy.
I had been sewing for a couple of years before I had kids. I felt like I was pretty good at sewing. Then I had kids and started sewing a lot more because everything was tiny, and I could use up my fabric scraps to sew baby clothing.
I made lots of baby and toddler clothing, and I loved it. I hated using zippers or buttons and buttonholes, so I quickly learned an easy and quick way to install snaps on baby clothes.
I have installed probably more than one hundred snaps between all the baby clothing I made for my three kids. I only had a problem with them falling out right at first when my fabric was too thick, and I didn’t install the snaps the right way.
Now I never have a problem with the snaps falling out.
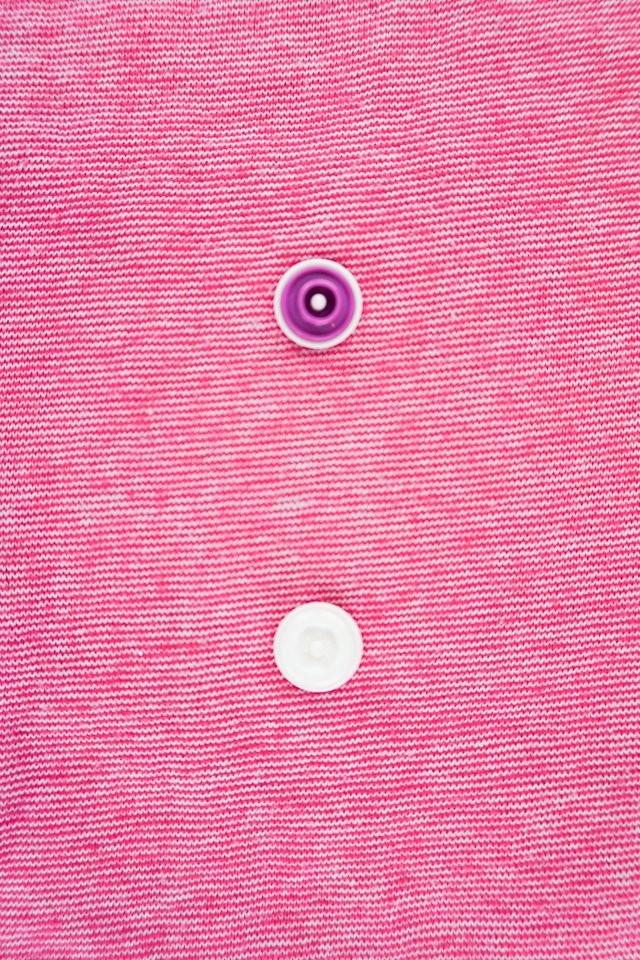
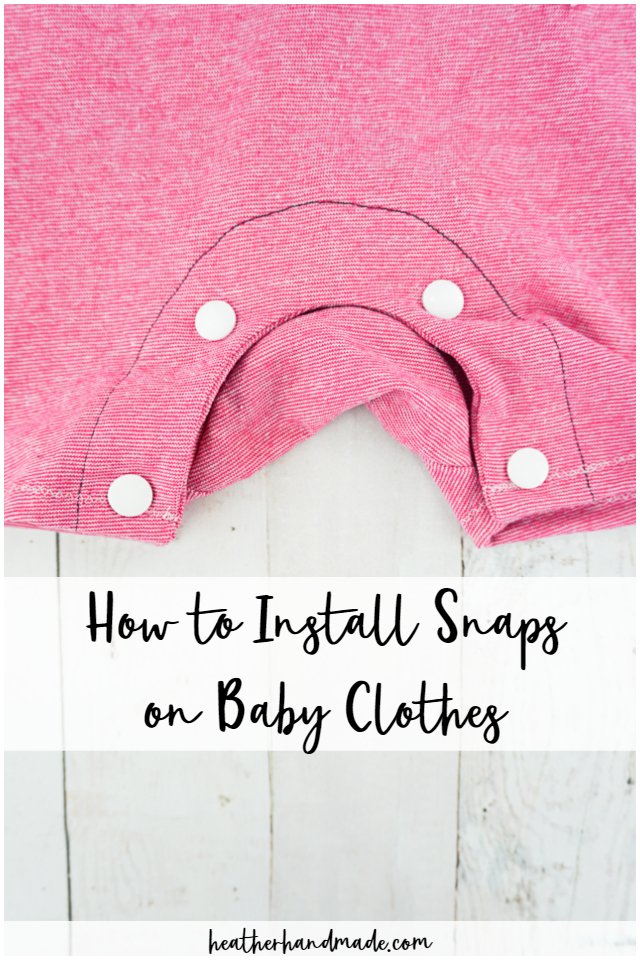
I use snaps on rompers, on the backs of dresses, and the shoulders of t-shirts. On patterns that call for buttons and buttonholes, I’ve replaced them with snaps.

I’ve never used other snap types on baby clothes, but I have used them for myself. I love using heavy duty snaps instead of buttons and buttonholes on jeans and button front skirts.
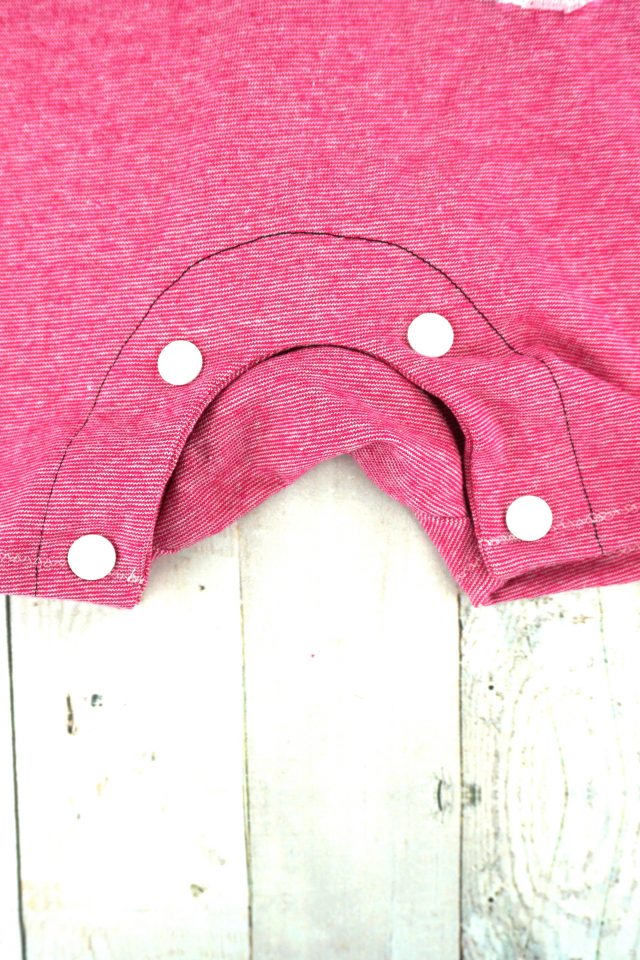
The baby sewing project I have used snaps the most is my Upcycled T-shirt Romper sewing pattern. There’s a free version in one size, and a purchasable version in multiple sizes and views. I use the snaps on the romper inseam to make diaper changes easier.
Best snaps on baby clothes
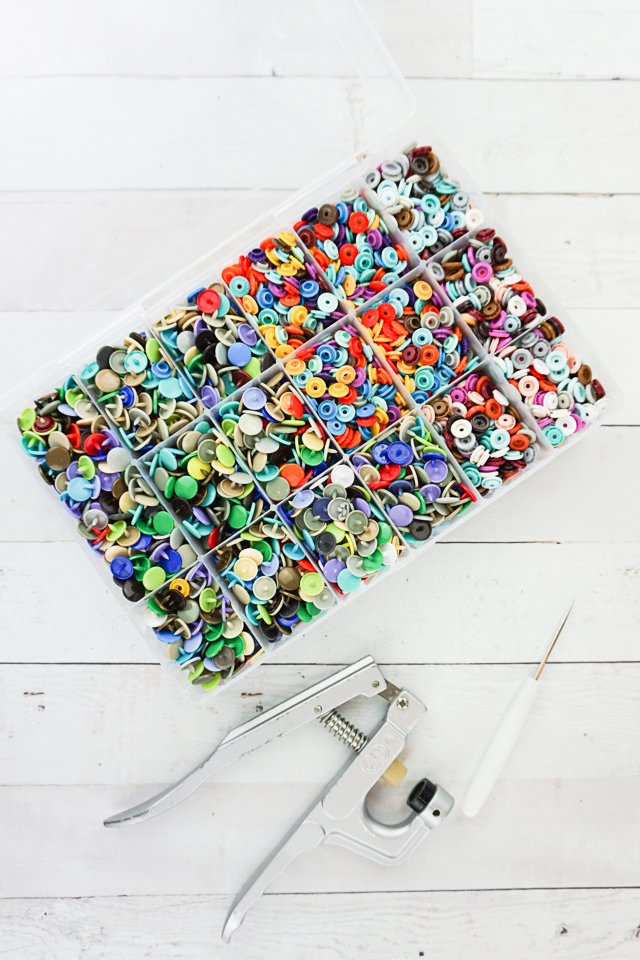
My very favorite snaps that I’ve used over and over and over again are Kam Snaps*. There are so many colors and sizes, and I love the pliers that make installation so easy.
I use size 20 snaps which I have found the easiest to find and the perfect size for baby clothes. I have collected a large collection of different colors over the years.
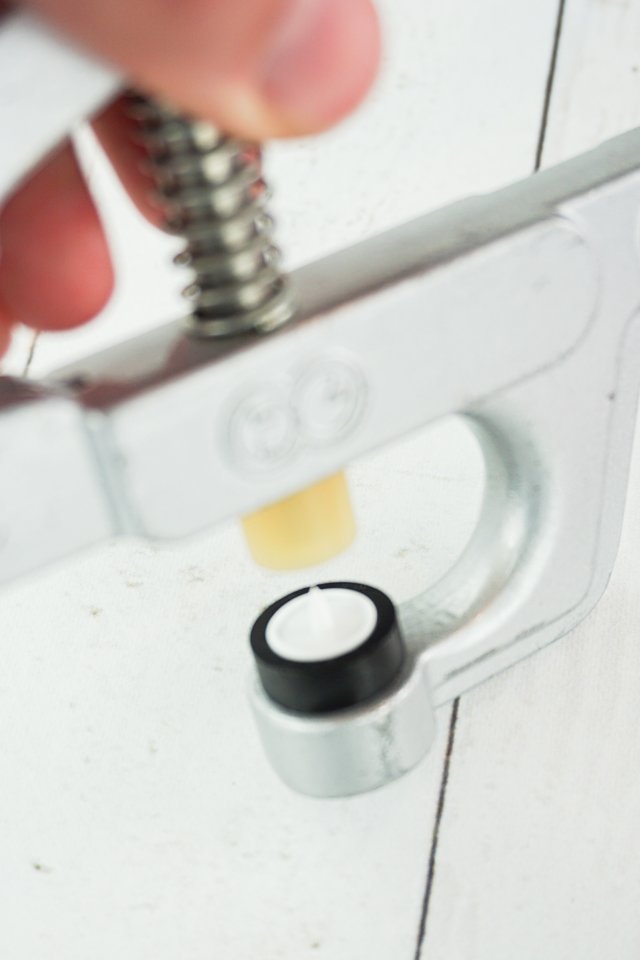
The parts of Plastic Snaps
When you install snaps there are four pieces: two for one side and two for the other side. Both sides use a cap which is the flat piece with a point.
Then there’s a stud which is the piece that has a circle that pokes out. Then theres a socket which is the piece and has a circle whole. It’s where the stud comes in and snaps.
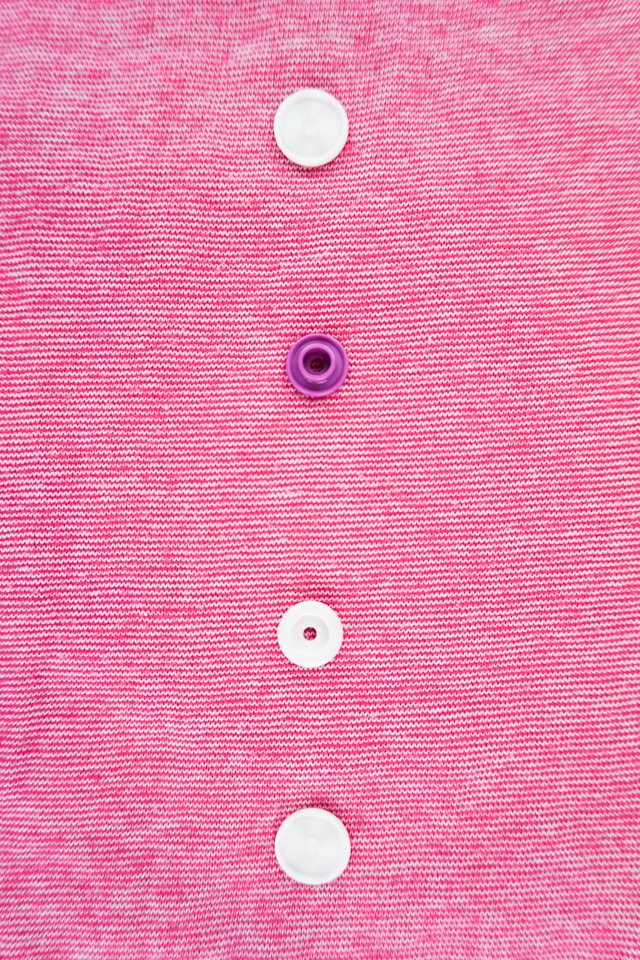
Both the stud and the socket fit into a cap. I’ve demonstrated in the picture below the stude and socket fitting into the cap, but there would be fabric in between the two pieces if you were really using it.
When you use the pliers the cap fits into the smooth black side. This means you might have to flip the fabric or pliers so that the cap can fit onto the black side.
How to Install Snaps on Baby Clothes
supplies
- Baby clothing with a closure like a romper, dress, t-shirt etc.
- Interfacing – make sure the fabric where the snaps will be is interfaced so that it’s stronger!
- Kam Snaps starter kit* with snaps and pliers
- Awl – this comes with the starter kid
- Marking tool
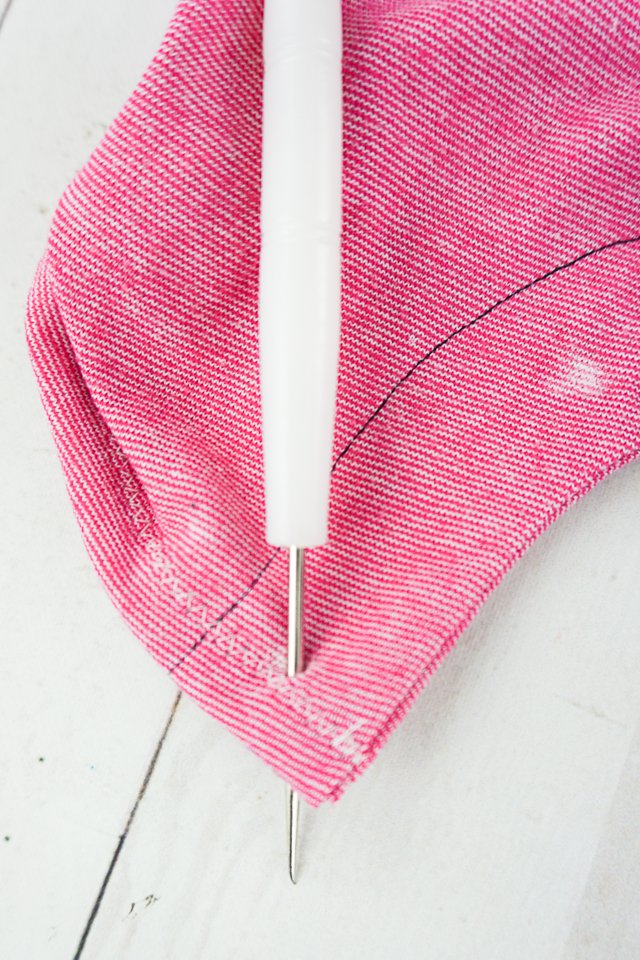
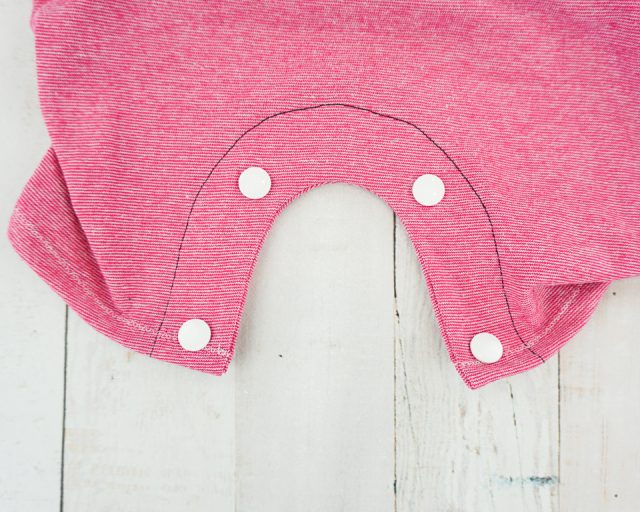
Mark the spots where the snaps will be install. You will mark opposite sides of fabric that come together.
Sometimes I mark and install all the studs, and then I go back to mark the sockets and then install them.
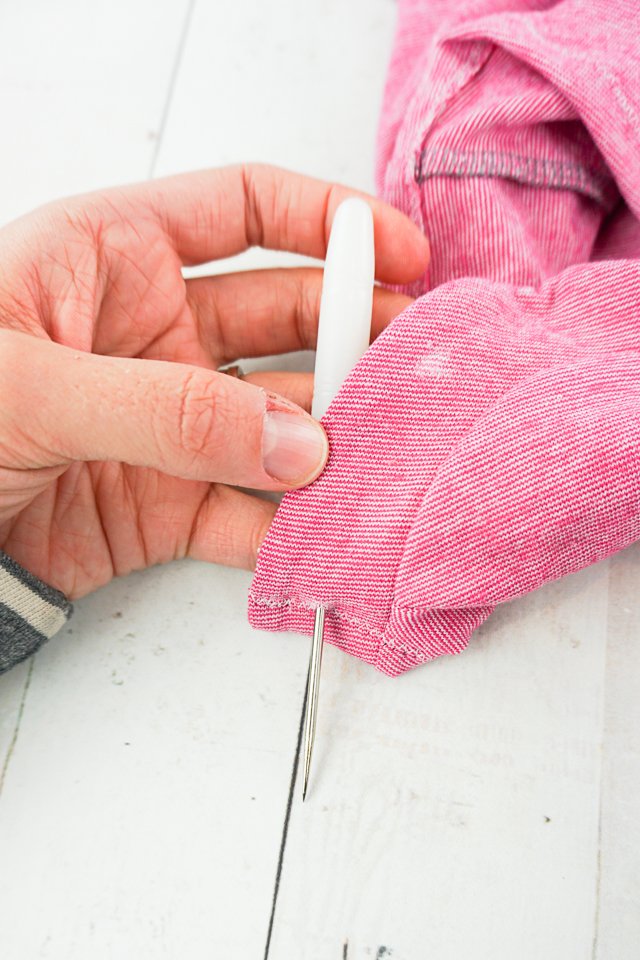
Use the awl to poke a hole through the fabric.
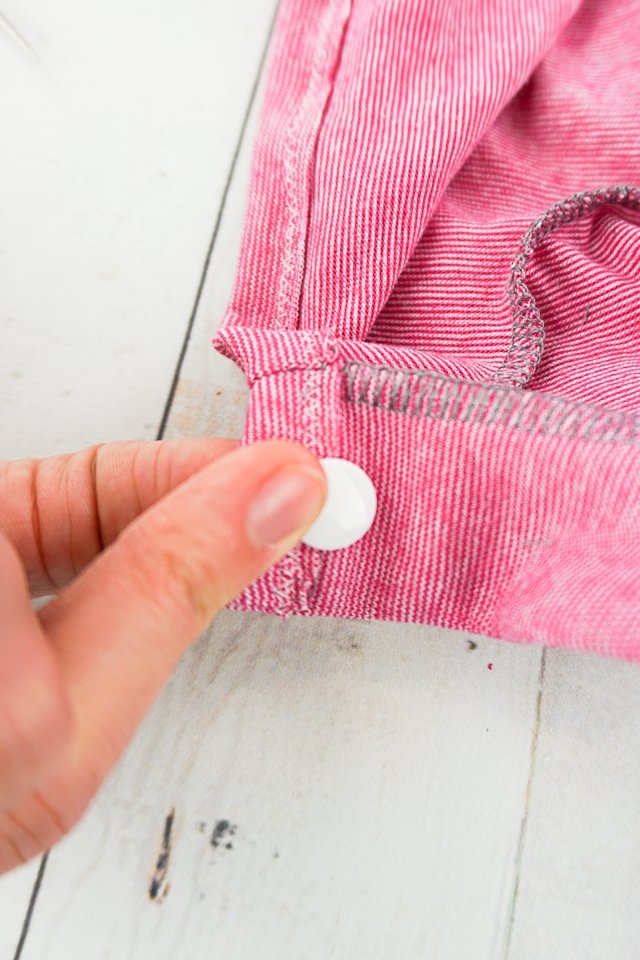
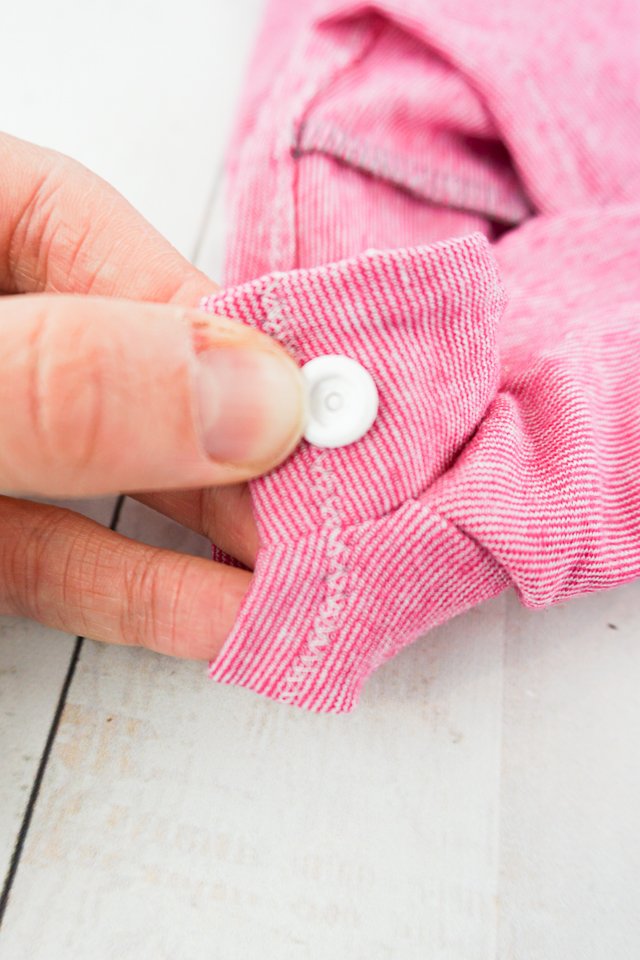
Place the cap point into the hole.
For the outer part of the snap, the cap should be on the right side of the fabric. For the inner part of the snap, the cap should be on the wrong side of the fabric.
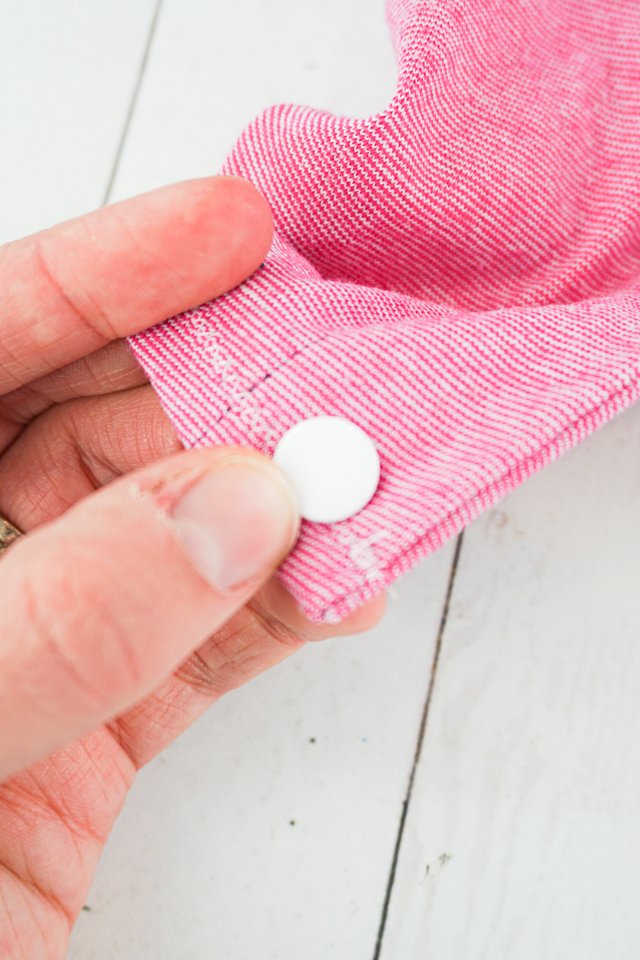
Place the hole of the stud over the point of the cap.
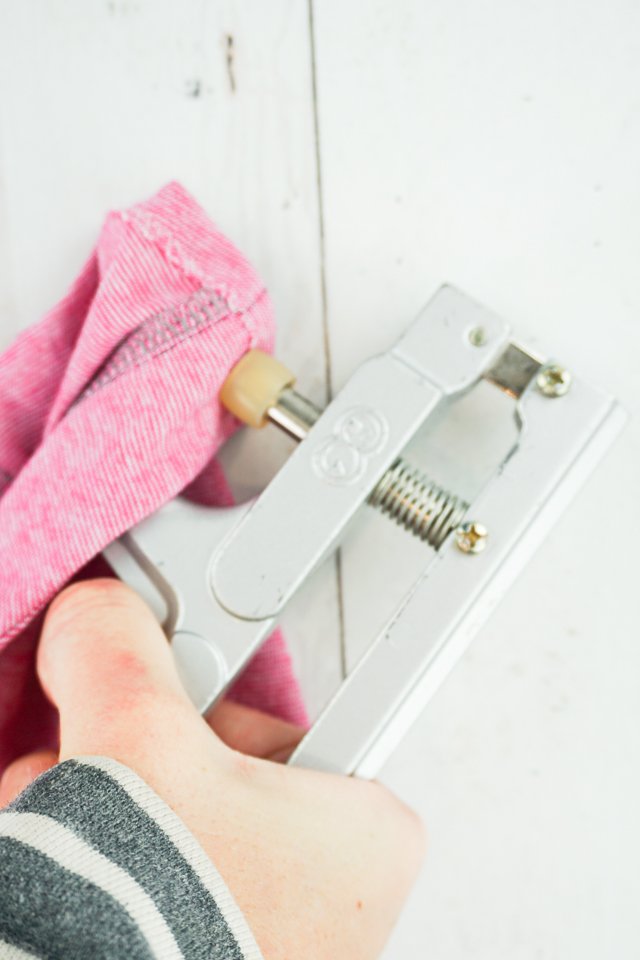
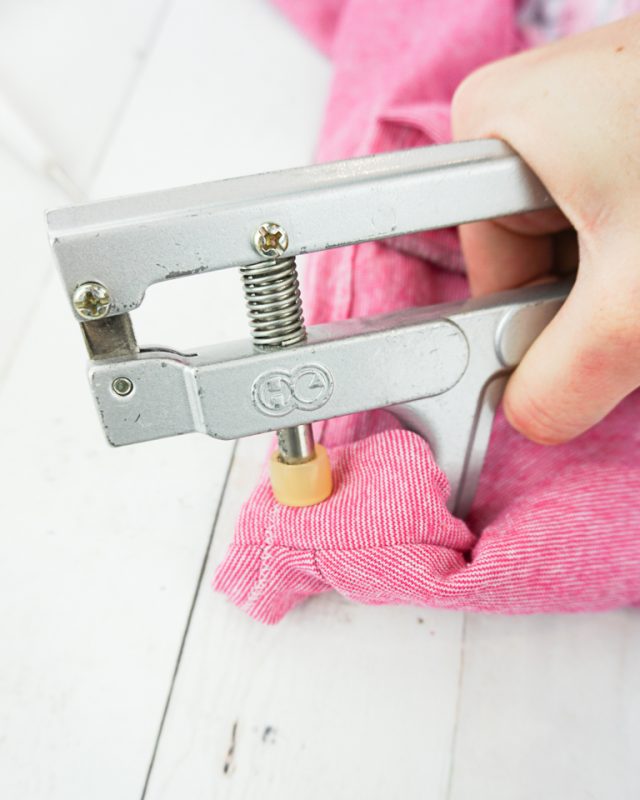
Place the pliers with the black part on the cap.
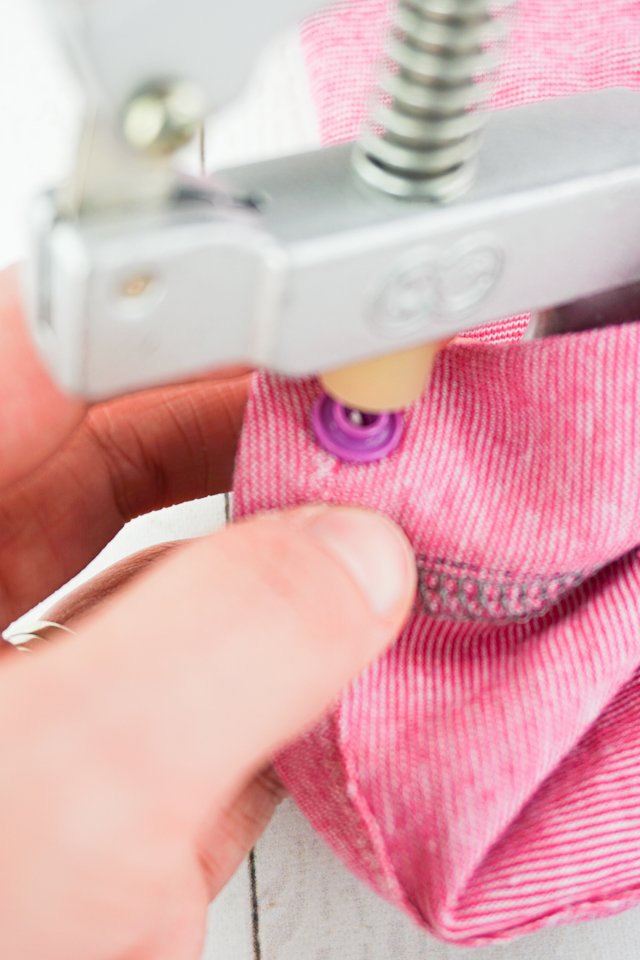
Apply the pressure with the pliers. The pliers smash the point part of the cap into a flat piece that is wide than the hole and keeps the two parts of the snap in place.
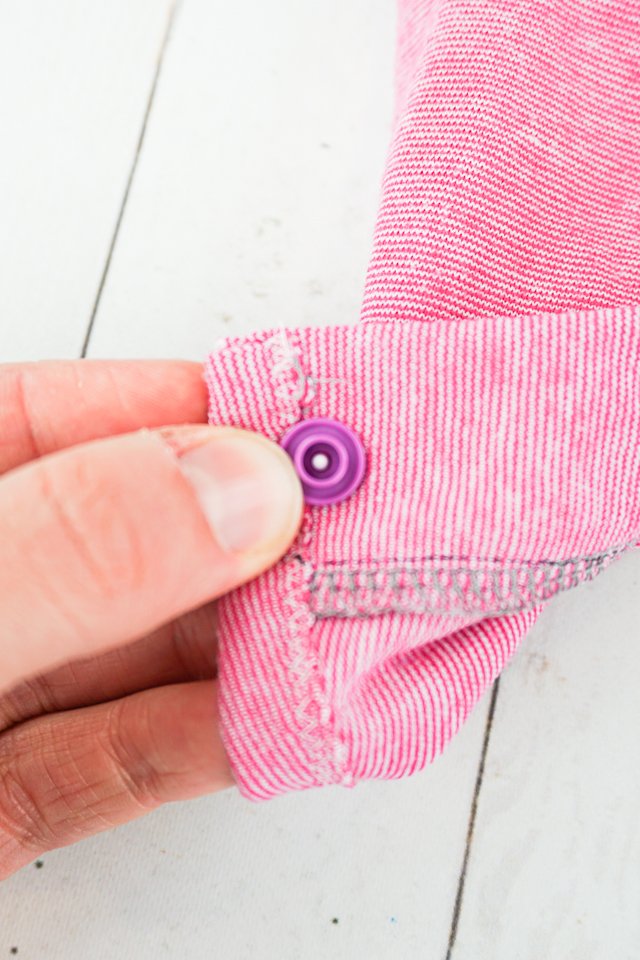
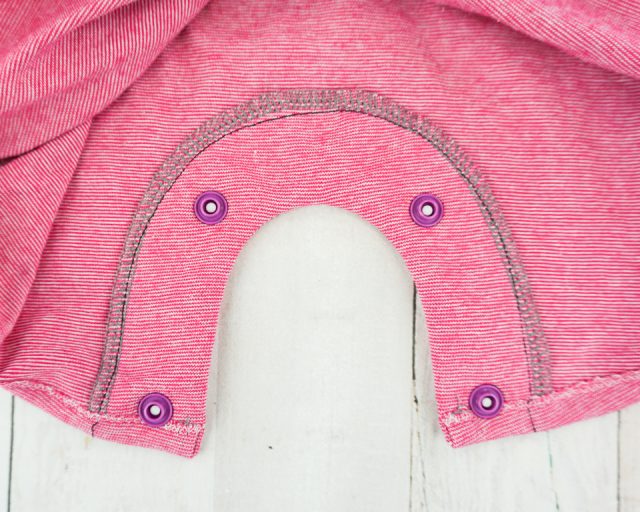
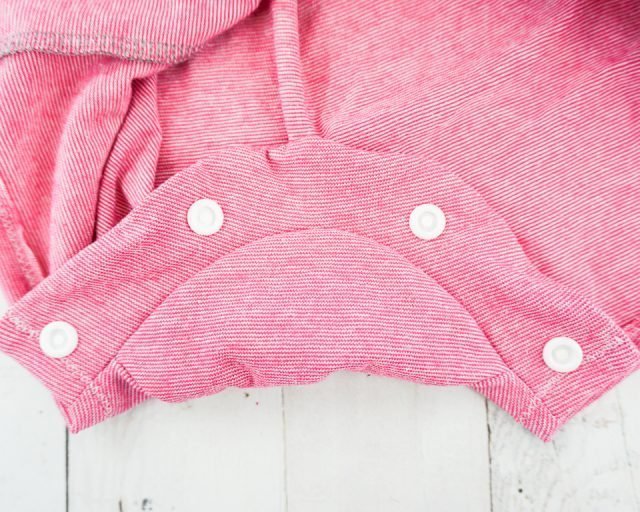
Finish adding all the snaps to the front. These caps will show on the right side of the garment.
These are the studs of the snaps and will be on the inside of the garment.
Use the awl to poke a hole through the fabric.
Place the cap point into the hole.
For the outer part of the snap, the cap should be on the right side of the fabric. For the inner part of the snap, the cap should be on the wrong side of the fabric.
Place the hole of the socket over the point of the cap.
Place the pliers with the black part on the cap.
Apply the pressure with the pliers. The pliers smash the point part of the cap into a flat piece that is wide than the hole and keeps the two parts of the snap in place.
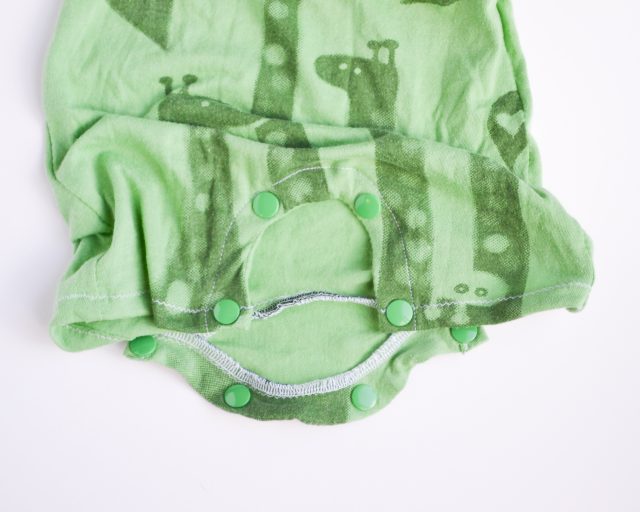
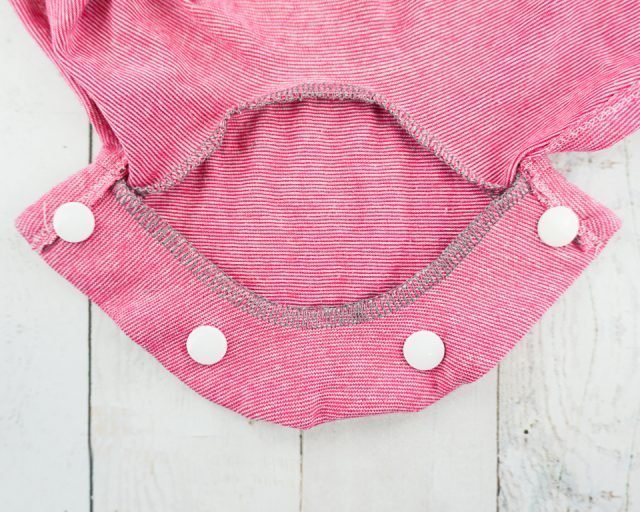
These are the sockets of the snaps and will be on the right side of the garment, but will be covered by the other part of the snaps.
Finish adding all the snaps to the back. These caps will show on the inside of the garment.
If you make something using this sewing project, I’d love to see! Please share it on social media with the hashtag #heatherhandmade and tag me!

I believe small sewing moments can create great joy. Find your own “right” way to sew. -Heather
I’ve never tried using snaps on clothes, but I will now. Thanks for the tutorial!
You’re welcome!
Just found this post. Thanks for the tutorial. Going to try to start sewing for my new granddaughter. What type/weight interfacing are you using? Pellon seems like it would be too stiff and uncomfortable.
If I’m doing knit fabric I use tricot interfacing. It’s a knit interfacing that will stretch with the fabric.
I have tried them but I find that they are too hard to snap together on baby clothes
Thank you for the detailed tutorial. I recently started sewing rompers for my new grandbaby. My daughter said the snaps are very difficult to pull apart. I am using KAM plastic snaps (I think they are 20). I bought the kit on Amazon. I am using cotton jersey with interfacing in the placket. Do you have any suggestions?
I wonder if another layer of interfacing will help. I find when the fabric is stretchy it seems like the snaps are hard to pull apart because I’m worried about ripping the knit fabric.
You mentioned thickness was an issue in the past, I’ve had similar problems. I don’t see where you address that issue?
I usually had a problem with thickness because there were too many layers of fabric. Usually I use thinner fabric, or I trim some of the inner fabric layers in a circle where the snaps will be attached.
The KAM SNAPS come with a regular pointed shaft and an extra long pointed shaft for thicker fabrics! You can purchase them directly at KAMSNAPS.COM and cheaper than Amazon, Etsy or Joann’s etc. sells the regular shaft KAM Snaps for.
I just restocked my supply of KAM SNAPS of all the colors I was out of or low on.
They also carry other sizes of the plastic KAM SNAPS like 14 & 16; glossy or Matt finishes, and different styles.
check them out.
Thank you so much for showing me what to do. I had already purchased the Kam starter kit. Now I can get started on putting them on my grandbaby’s outfits, thanks to you
Which brand of snap pliers do you like best? And snaps?
I like using Kam snaps the best and their coresponding snap pliers. There’s a link to the ones I like in the supplies list.
Thank you for this wonderful explanation of instillation of Kam Snaps.