
How to Upcycle a Tee Neckline

This post may contain affiliate links.
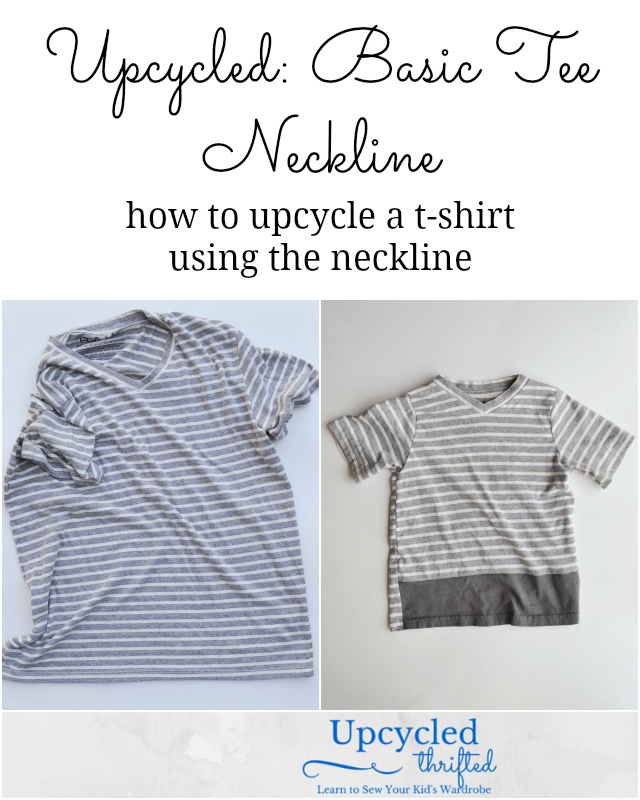
Learn how to upcycle a t-shirt neckline so that you can turn an adult t-shirt into a child sized t-shirt using a free tee sewing pattern!
If you hate sewing necklines, then this is the upcycle tutorial for you. (I hate sewing hems so yesterday’s tutorial about reusing hems is for me
) You do have to hem your shirt, but to you that might be easier than dealing with stretchy necklines. I especially love v-neck tees but hate the extra work of the v-neck, so I love to upcycle large v-neck t-shirts.
Here’s some tips for sewing knit fabric.
what is upcycling?
Upcycling is to reuse material to create something better than the original. I usually use this to describe when I’m sewing adult clothing into clothing for children or I’m sewing clothing into an accessory or house item.
Upcycling saves time, saves money, saves the environment, and saves memories.
Save time by reusing details from the original shirt. Save money by using something you already have.
Save the environment by keeping t-shirts out of the landfill. Save memories by reusing a favorite adult t-shirt for your toddler or child.
The problem of part of the shirt being cut out made a really fantastic colorblocking detail. I really love the stripes next to the block of dark gray. It’s a really fun detail!
How to Upcycle a Tee Neckline
Supplies
- V-neck tee
- Sewing supplies
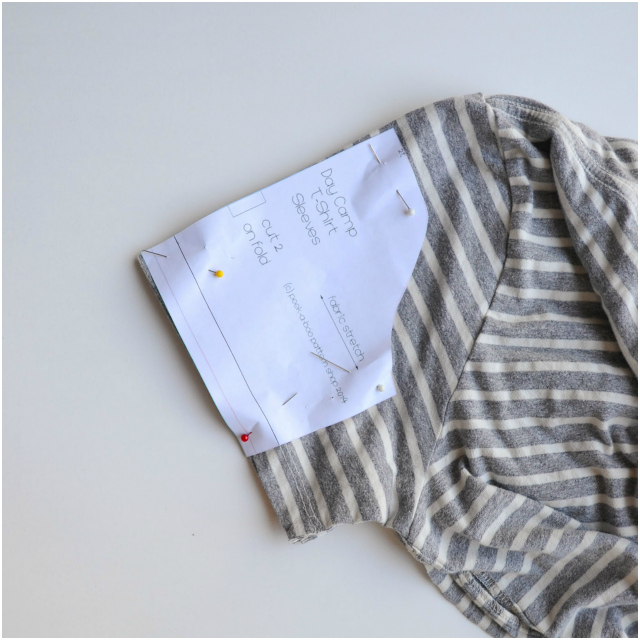
- Tee shirt pattern – I used the free tee shirt in the Day Camp Set from Peek-a-boo Pattern Shop.
Instructions
1. Cut the shirt along the side seams through the sleeves to open up the sides.
2. Reusing the neckline is a little tricky, and you might have to play with it. Fold the shirt at center front and line up the pattern on the fold. Line up the neckline as closely to the pattern as you can. The pattern I used was not a v-neck, but I could still line it up with the curve.
3. The back neckline of adult shirts is usually a pretty shallow curve, so I just stretch the neckline a bit to make it work. Line up the center back of the pattern along the fold of the shirt.

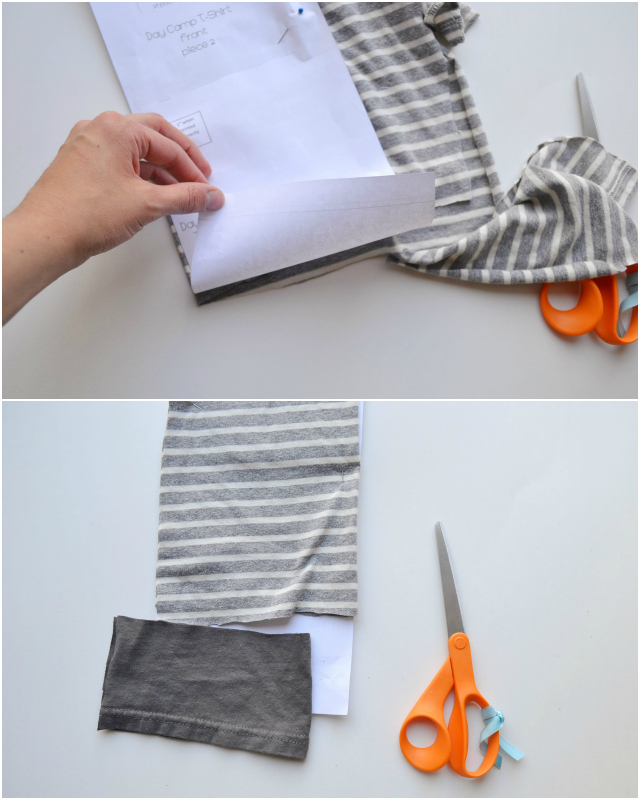
4. Cut out the sleeves. I did reuse the hems on the sleeve when I cut them out. See how I drew on the hem allowance? I did not eliminate it when I cut out the sleeves which resulted in my sleeves being slightly longer than the pattern’s length.
5. Now you can assemble the pattern the way the instructions recommend.
*I have an extra tip. I used part of the bottom of the shirt for another upcycle coming later in the series. This meant that the front of the shirt was shorter than the pattern. I still cut out the front and used a gray scrap to make up for what was missing.
Don’t forget to share your upcycled inspired projects by using the hashtag #upcycledkid! And get ready for tons of more really fun upcycling projects!
Find the big list of all the upcycling tutorials I’ve created!


I believe small sewing moments can create great joy. Find your own “right” way to sew. -Heather