
DIY Queen of Hearts Costume

This post may contain affiliate links.
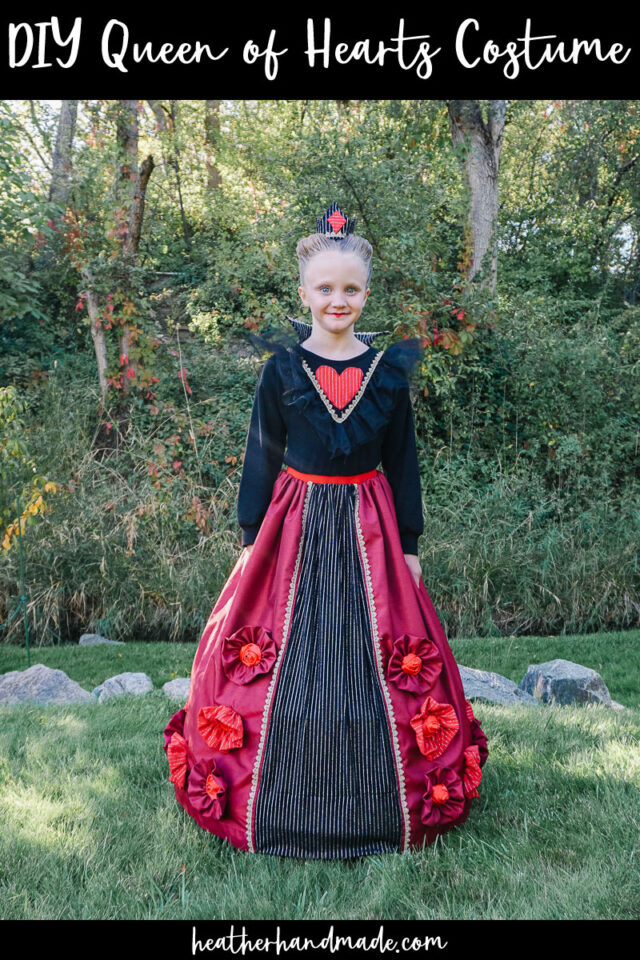
Learn how to make a DIY Queen of Hearts costume with this fun tutorial. This Halloween costume can be customized just the way you like it.
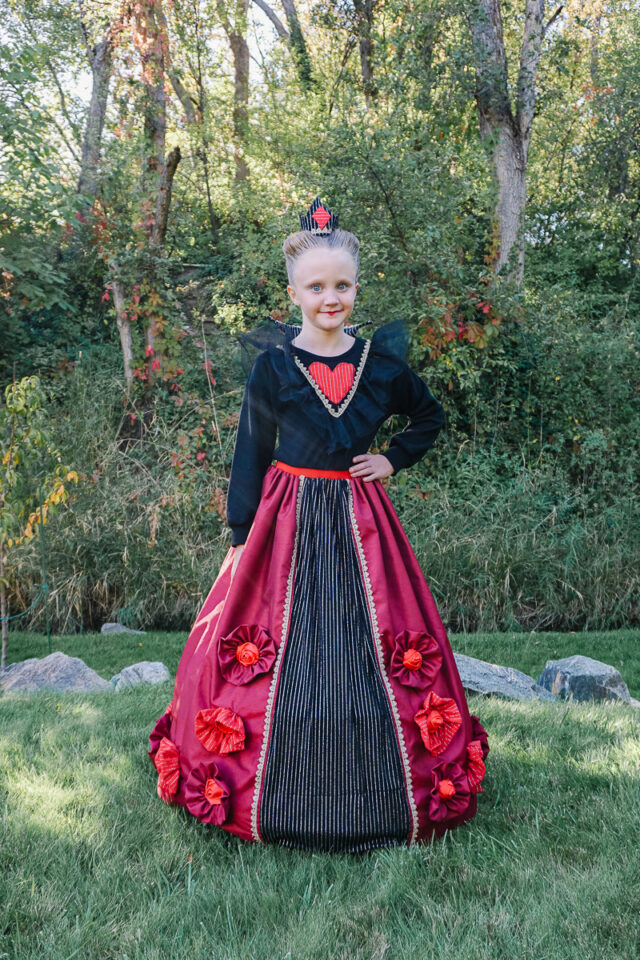
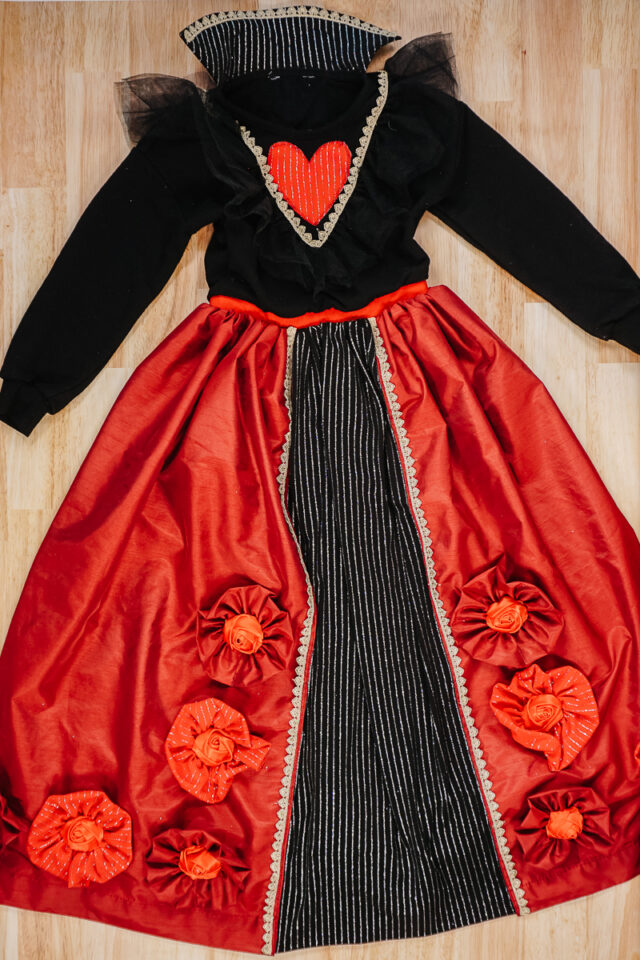
My daughter chose the Queen of Hearts for Halloween this year. I was so excited because this was a costume I’ve wanted to make for years. Luckily, Descendants 4 had come out this year with a Queen of Hearts character.
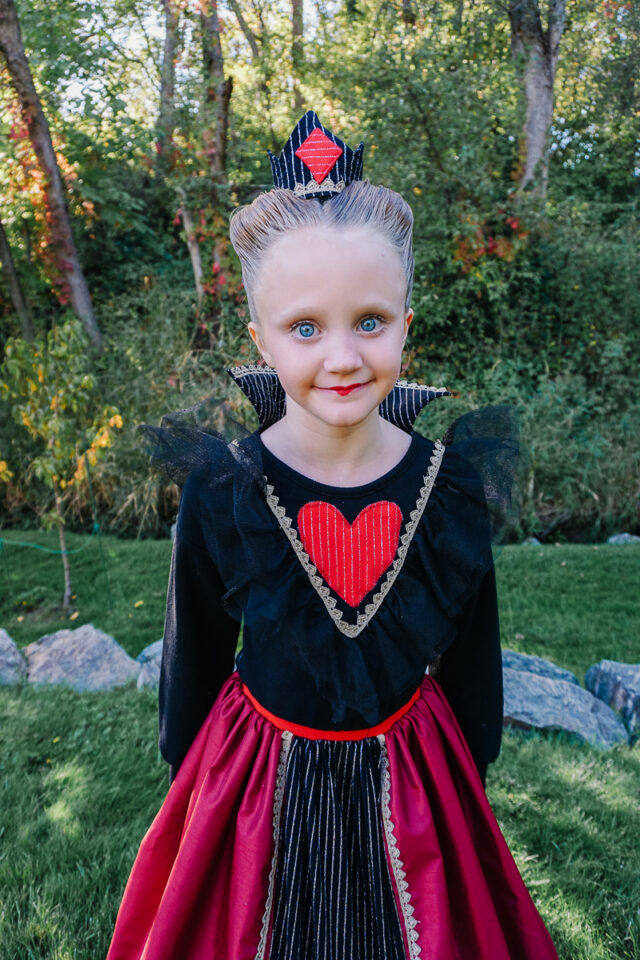
When I started designing and planning this costume, I wanted it to look like a stately queen of hearts without looking like the cartoon Queen of Hearts, the Descendants Queen of Hearts, or any other movie Queen of Hearts. I pulled it together with lots of red and black, sparkles, and hearts. I personally think it’s very easy to tell that she’s the Queen of Hearts!

What do I need to make a DIY Queen of Hearts Costume?
I’ll briefly state what supplies I used for the costume, and then the tutorial below will share how to make everything.
Dress
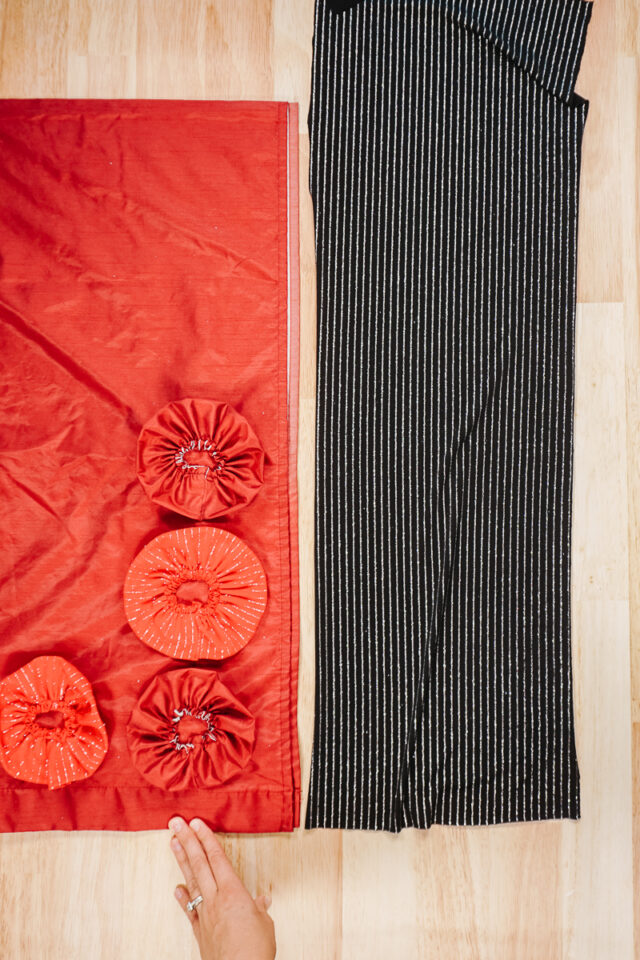
Start with a black dress with ruffles or black shirt with ruffles*. I thrifted mine at the thrift store. Then you’ll add a red skirt with stiff fabric like taffeta. I could not find fabric with enough body, so I bought two red curtain panels* to use as the skirt and it worked great.
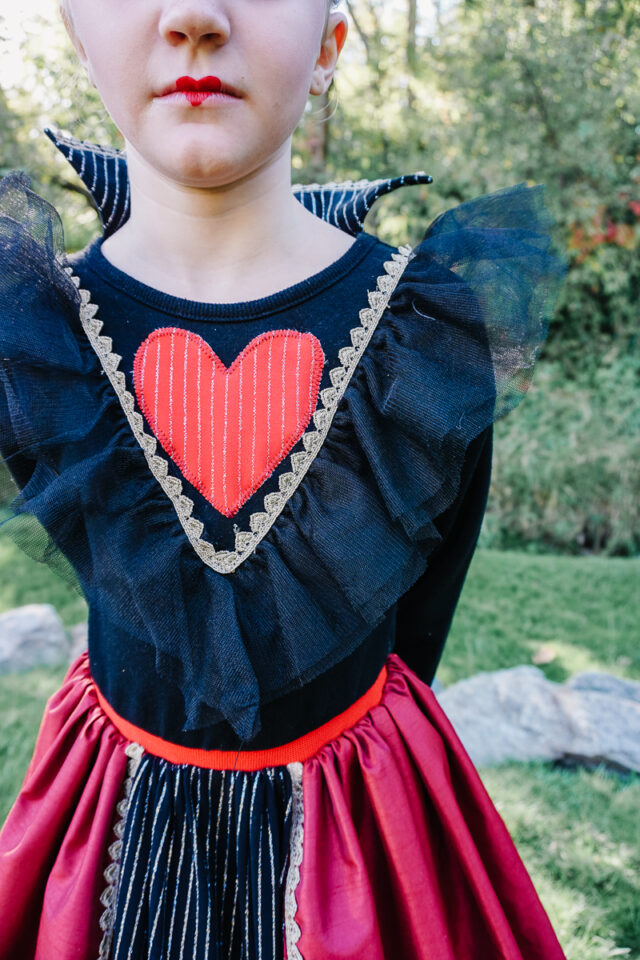
I used a little bit of 2 inch wide red elastic*, gold heart trim*, and black striped sparkly fabric and red striped sparkly fabric. I also added 2 inch red ribbon flowers* to my fabric flowers to make them stand out more.

Crown
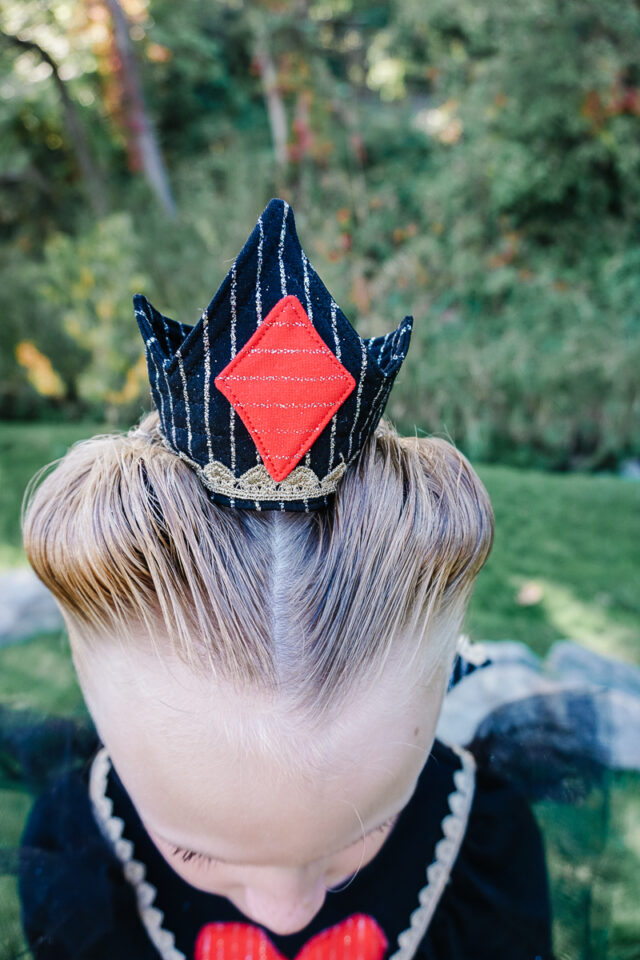
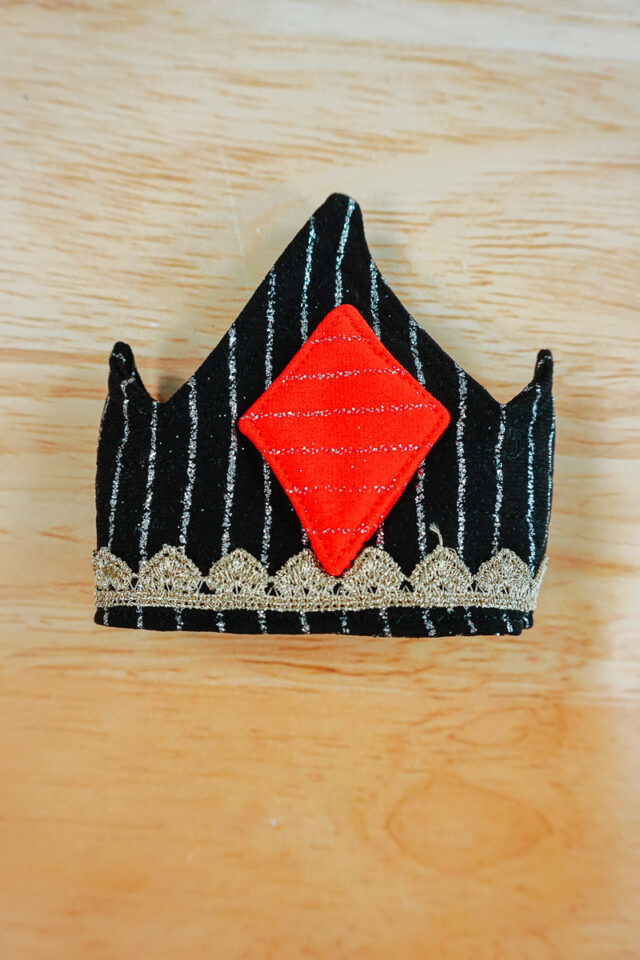
I made the crown with the black striped sparkly fabric and interfacing. I added the gold heart trim* to the bottom and a diamond made from the red striped sparkly fabric.
Hair and Make-Up
What really makes a Queen of Hearts costume is the hair and make-up. My daughter is wearing mascara and bright red lips in the shape of a heart. Then we did her hair with two bumps at the front and a bun in the back. The crown is nestled on her head right behind and between to two bumps.
Love to sew? Try one of these sewing projects:

DIY Queen of Hearts Costume
Supplies
- Black dress or shirt – black dress with ruffles or black shirt with ruffles*
- Stiff red fabric or two red curtain panels – two red curtain panels*
- 1/2 yard of each red and black sparkly fabric – black striped sparkly fabric and red striped sparkly fabric.
- Lightweight fusible interfacing
- 4 yards of gold heart trim*
- 2 inch wide red elastic*
- 2 inch red ribbon flowers*
- Fusible fleece
- Sewing tools
- Sewing machine
I didn’t do everything in the right order (like sewing on the trim very last), but I really meandered through this costume. I kept getting better ideas and adding new things. And that’s why it’s fun to sew!
Put the black shirt or dress on and mark the waist all the way around. Add seam allowance below the marks.

Cut the shirt or dress into a bodice.

Cut the red fabric into the skirt length you want. If you are using fabric you need to add hem allowance and sew the hem.

Make a bunch of fabric flowers in the red sparkly fabric and skirt fabric.

Sew the fabric flowers around the hem of the skirt. I also hand sewed the red ribbon flowers in the middle to make my fabric flowers look more like flowers.

Cut a 12 inch panel from the black striped sparkly fabric for the center front of the skirt. Hem one short end.
Sew it onto the skirt at the front. Then sew the curtain panels together at the center back to create one wide tube.
Sew two rows of basting stitches along the top edge of the skirt. Pull the bobbin thread to gather the skirt.
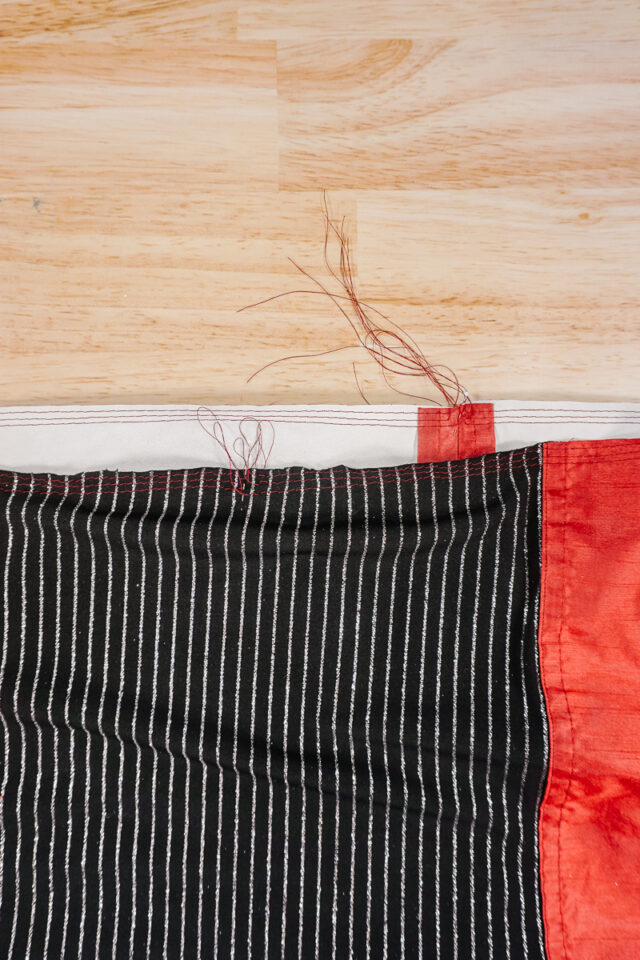
Gather the skirt so it’s a little big bigger than the waist. You want the elastic to gather the rest of the skirt so the elastic can still stretch.

Cut the elastic to the right length. Sew the short ends together to create a loop.

Sew the skirt onto the elastic. Stretch the elastic as you sew to keep the ability to stretch. Sew with a zigzag stitch or serger.

The skirt portion is now finished.

Draw a heart on the back of the interfacing. Fuse the interfacing onto the back of the red striped fabric.

Cut out the interfacing heart.

Pin the heart to the center front of the black bodice. Sew it onto the bodice by sewing a zigzag stitch around the heart.

Cut a 1/4 circle from paper. The inside curve should be the length of the back neckline. Add seam allowance.

Use the curve pattern to cut two pieces of black striped fabric, one piece of interfacing and one piece of fusible fleece. (I wish I would’ve done two pieces of interfacing and two pieces of fusible fleece to make it even stiffer.)

Fuse the interfacing and fleece to the back of the fabric.
Quilt the piece with fleece to give it more stability.

Place the collar pieces right sides together. Sew around the edge and leave a hole for turning.

Trim the corners.

Turn the collar right side out. Edgestitch around the edges to neaten them and to close the hole.

Sew the collar onto the back of the bodice necline.

Use the same method as the collar to make a red striped heart with multiple layers of interfacing. Sew the heart onto the collar and bodice to make the collar stand up really well. The heart is also a great symbol for the Queen of Hearts from the back.

Sew the bodice waist onto the top of the elastic. Stretch the elastic as you sew and sew with a zigzag stitch.
This was the point that I decided to add the heart trim. I sewed it onto each side of the center front skirt panel, around the shoulder ruffle on the front and back, and on the top edge of the collar.
Then I used the same method as the collar to make a queen’s crown. I used the black striped fabric for the crown base and points. Then I added a diamond with the red striped fabric and sewed the heart trim around the bottom.
To make the crown stay on my daughter’s head, I add two bobby pins to the side of the crown in the trim. The bobby pins slide into her hair and the crown stays put.
If you make something using this sewing project, I’d love to see! Please share it on social media with the hashtag #heatherhandmade and tag me!

I believe small sewing moments can create great joy. Find your own “right” way to sew. -Heather