
Cute DIY Bow Ornament + Free Sewing Pattern

This post may contain affiliate links.
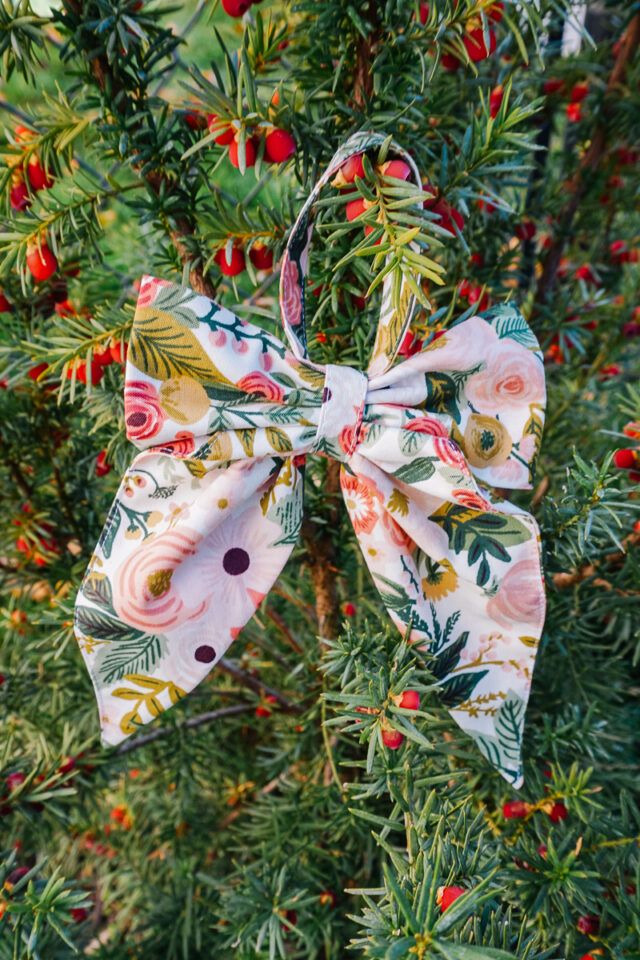
Learn how to make a DIY bow ornament with a free sewing pattern. This Christmas sewing project is great for using up scraps of fabric.
Bows are so popular in home decor and fashion right now. There are big bows, small bows, ribbon bows, patchwork bows, and fabric bows. Bows are so cute and simple, and they are so fun to sew!
There are lots of different styles and kinds of bows, and today I’m teaching you how to make a classic cotton fabric bow with a loop so that it can be hung on a Christmas tree. Or anywhere in your home! It’s a great way to use up fabric scraps since the pieces are tiny, and you can mix and match fabrics. I can’t wait to cover a whole tree with bows!
What fabric should I use to make a bow ornament?
These bow ornaments are best when made out of quilting cotton fabric. You need lightweight woven fabric. Since there’s some gathering, it wouldn’t work well with thick or heavy fabric.
You don’t need any interfacing or fusible fleece so it’s a quick, easy, and cheap sewing project.

Love to sew? Try one of these fun sewing projects:

How to Make a DIY Bow Ornament
Supplies
- Scraps of quilting cotton
- Sewing tools
- Sewing machine
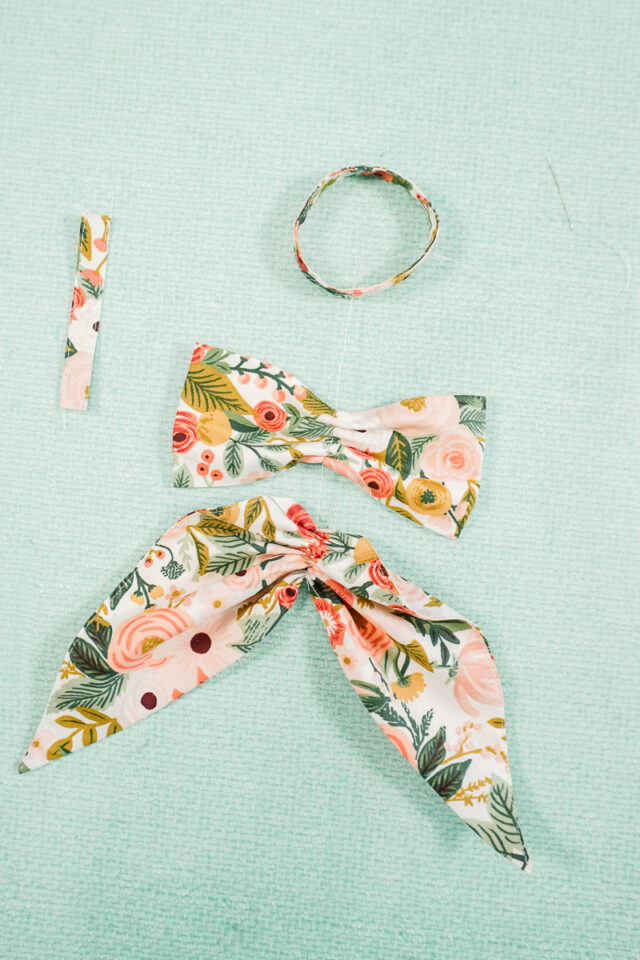
Free Pattern Measurements
- Bow “ears”: 11.75 inches wide by 6 inches tall
- Bow “tails”: 9.75 inches wide by 9.75 inches tall
- Center: 2 inches wide by 3.5 inches tall
- Loop: 2 inches wide by 8 inches tall

Instructions
Fold the bow ears in half wrong sides together matching the long edge. Sew the long edges with a 1/4 inch seam allowance. Backstitch when you start and when you stop.

Turn it right side out.

Press it flat with the seam allowance in the center of one side.

Fold in half wrong sides together matching the short edges. Sew with a 1/4 inch seam allowance and backstitch when you start and when you stop.

Turn right side out. Press flat with the seam in the center of one side.

Fold the bow tails in half diagonally wrong sides together matching two of the corners. Sew along each open side. Leave a 2 inch hole for turning. Backstitch each time you start and stop.

Trim the corners to reduce the bulk.

Turn the bow tails right side out.

Roll the seams and press the bow tails flat. Make sure the seam allowance is tucked inside when you press the hole.

Pinch the hole closed. Edgestitch along each seam side to neaten the edges and close the hole. Backstitch when you start and when you stop.

Sew a gathering stitch down the center of the bow ears and the bow tails. Pull the bobbin thread to gather each piece. Pull the threads and tie them off to secure the gathering.

You will press the loop and center the same way. Fold in half with wrong sides together matching the long edges. Press. Unfold and take each long each to meet at the center fold and press. You now have three folds. Fold the edges in and then fold the center fold. The raw edges are now enclosed inside.

Sew along each side of the center piece to secure the folds.

Open the loop folds. Sew the short ends right sides together with a 1/4 inch seam allowance.

Fold the loop back up along the pressed folds. Sew along each side of the loop to secure the folds.

You now have a loop, center, bow ears, and bow tails ready to be assembled.

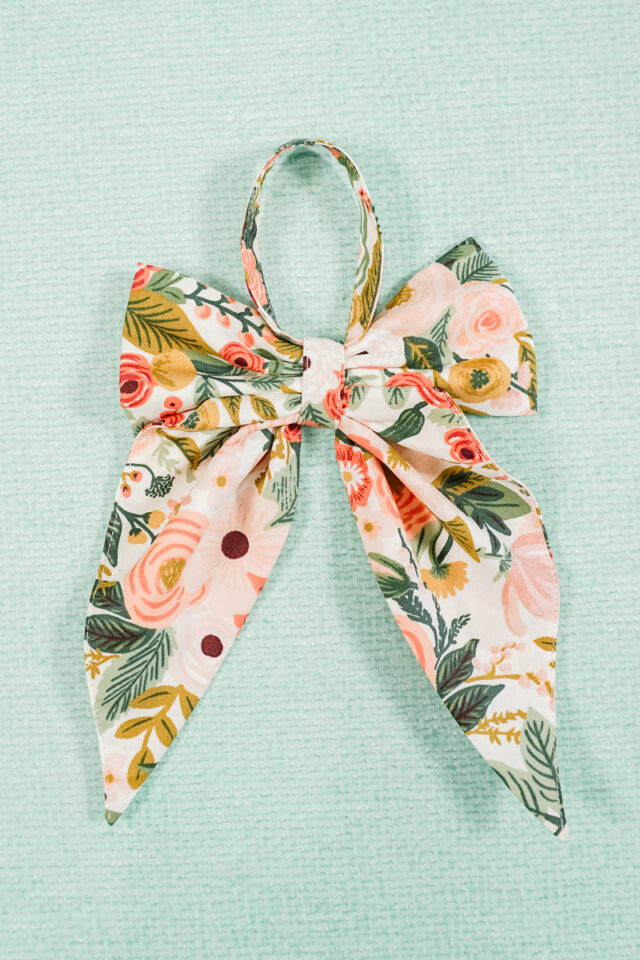
Take a hand needle and thread it with two threads. Push the needle through the bottom of the bow tails, through the gathers, through the bottom of the bow ears, through the gathers, and up through the loop.
Pull it tight and tie it off.

Wrap the center around the bow with the ends wrapping to the back.

Wrap the center tight and fold one short end over so that it’s hidden. Hand sew the center in place and tie off.

You finished! Hang it on a tree or anywhere else in your home!
If you make something using this sewing project, I’d love to see! Please share it on social media with the hashtag #heatherhandmade and tag me!


I believe small sewing moments can create great joy. Find your own “right” way to sew. -Heather
Hi. I love this project!
I’m missing a step after creating the 2 triangle tails & gathering each of them. How are the 2 tails joined together? Are the layered on top of each other and then sewn with a gathering stitch down the center? Or, are they gathered separately then layered on top of each other and then joined with the hand stitching that goes through the center of tails, bow ears and hanger?
I will try it both ways, but thought others might be confused too. 🥰
There’s one ears and one tails. There aren’t two tails to put together. Does that answer your question?